Team:NTU-Singapore/Wetlab/Protocols
From 2008.igem.org
Lalala8585 (Talk | contribs) |
Lalala8585 (Talk | contribs) (→Creation of New Biobrick parts) |
||
| Line 22: | Line 22: | ||
'''EcoRI – XbaI - Lysis gene – SpeI – PstI'''<br><br> | '''EcoRI – XbaI - Lysis gene – SpeI – PstI'''<br><br> | ||
| - | [[Image: | + | [[Image:Cycle_mindmap.jpg|center]] |
=Digestion and Ligation of NTU@iGEM System= | =Digestion and Ligation of NTU@iGEM System= | ||
Revision as of 14:17, 24 October 2008
|
Creation of New Biobrick parts
To create a new biobrick part, the first step is to identify the gene of interest. In this project, our genes of interest are the E7 production gene, Immunity gene, and Lysis gene that is obtainable from the plasmid ColE7-K317 in BW Escherichia Coli strain. Another gene of interest is the LsrA promoter that is obtained from MG1655 Escherichia Coli strain. Information on the genome of interests is extracted from relevant publications and websites such as NCBI net.
For example the gene of interest – Lysis gene:
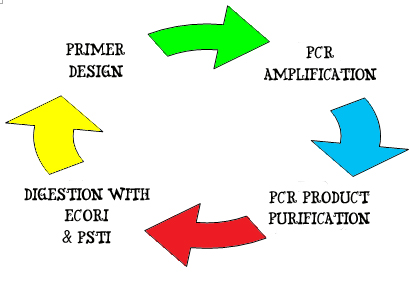
1. A pair of DNA primers, 10 ~ 15 nucleotides in length are designed and synthesized to flank the forward 3' – 5' end and reverse 5' – 3' end of the gene of interests. The primers also contain blunt ends of the EcoRI, XbaI, SpeI & PstI restriction sites. These primers will hook on to the double strand DNA by complementary pairing and serve as initiation and termination site of DNA amplification.
2. Amplification of the lysis gene occurs by PCR amplification. A gel electrophoresis is run, followed by a gel extraction of the specific interest.
3. The lysis gene is then purified using the PCR purification kit. Purified DNA is tested for concentration and purity using NanoDrop.
4. Next, the purified DNA is digested using EcoRI and PstI restriction enzymes to generate a standard Biobrick part with the gene sequence:
EcoRI – XbaI - Lysis gene – SpeI – PstI
Digestion and Ligation of NTU@iGEM System
To ligate 2 Biobrick parts together, firstly we identify one part to be "vector" and the second part to be "insert". There are 2 possibility of ligation:
- Case I: Insert in front – Vector behind
- Case II: Vector in front – Insert behind
Case I: Insert in front – Vector behind
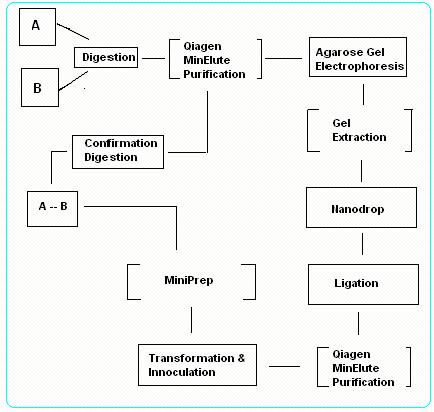
1.Digest Insert gene with EcoRI & SpeI and Vector gene with SpeI & PstI.
Purify the digested products with PCR Purification Kit and test for concentration and purity using NanoDrop.
2.Perform a gel electrophoresis of the purified products, followed by a gel extraction using PCR Gel Extraction Kit.
3.Fuse the Insert gene to the Vector gene to form a circular plasmid DNA using T4 DNA Quick Ligase.
Transform the DNA plasmid into Top 10 Competent Cells and select using appropriate antibiotic treatment.
Vector gene contain antibiotic resistant gene that confers resistance to the cells that are successfully transformed.
4.Extract the ligated DNA using MiniPrep Kit and digest the resultant DNA using EcoRI & PstI.
5.Lastly, perform a gel electrophoresis for confirmation. Check if the nucleotide length from the gel run matches the hypothetical nucleotide length of the digested product. If the result matches, ligation is successful.
Case II: Vector in front – Insert behind
1. Digest Insert gene with XbaI & PstI and Vector gene with EcoRI & XbaI. Purify the digested products with PCR Purification Kit and test for concentration and purity using NanoDrop.
2. Repeat Step 2 ~ 5 as from Case I
Characterization of standard Biobrick via GFP Activity
The objectives of the characterization experiment are to investigate the effects of concentration of inducer, temperature and time on the production of Green Fluorescence protein (GFP) by the Biobrick promoter part being experimented. A stronger fluorescence, as measured using NTU FLx800™ Fluorescence Microplate Reader will indicate more GFP proteins being synthesised. This also corresponds to higher promoter activity.
Top10 competent cells are transformed with plasmid carrying the following gene sequence:
The cells are cultured and upon addition of the inducer, the reaction mixtures (with both cells and inducer) are fed into the Fluorescence Microplate Reader. This machine has inbuilt software, KCJunior which will translate the results into excellent data suitable for analysis. The samples’ fluorescence was measured for a period of 12 hours, at the temperatures of
i) 25°C
ii) 37°C
and iii) 42°C.
The readings were than plotted to produce a 3-dimentional graph for detail analysis.
For more information please refer to Characterization of pLacI-GFP
Characterization of pLsrA - YFP
1) The successfully ligated plasmid with pLsrA-YFP gene was first transformed into chemically competent LuxS(-) cells.
2) The next day, one colony of cell with pLsrA-YFP plasmid was inoculated in 5ml LBA for 16 hours at 37oC and shaked at 225 rpm.
3) Overnight cell culture was then centrifuged at 4000 rpm and 4oC for 10 minutes.
4) The supernatant was discarded and cell pellets were re-suspended in 5ml of Ampicilin-containing M9 medium. The amount of M9 medium was adjusted until cell suspension had an OD600 of 1.
5) The cell suspensions were then pipetted into 96-well microplate wells. This was followed by the adding of 50µl AI-2-containing supernatant into corresponding wells.
6) There were 6 different supernatant solutions used, which correspond to the time points when they were obtained: 2, 3, 4, 5, 6, 8 hours.
7) There were 3 different negative control samples being used for this study.
  * The First control sample contained cell suspension only.

  * The Second control sample was cell suspension with 50µl pure water added.

  * And as the supernatants also contain large amount of LB, cell suspension with 50µl

    LB added was also used as another control sample.
8) YFP measurement was carried out by VICTOR 3 multilabel reader at excitation wavelength of 490 nm and emission wavelength of 535 nm.
9) Data were automatically gathered every 10 minutes and temperature was set at 37oC.
OD600 measurement of pLsrA-Lysis-containing LuxS mutant upon addition of AI-2
1) One colony of LuxS(-) W3110 strain containing pLsrA-lysis plasmid was inoculated overnight in 50ml LB inside 250ml flask at 37 degrees C and 225rpm.
2) After 16 hour inoculation, 0.5 ml of cell sample was diluted in 50ml fresh LB.
3) Diluted cell sample was distributed into the wells of the black-96-well microplate with an amount of 200 µL per well.
4) 50µl AI-2-containing supernatant was added into corresponding wells initially (set 1) and 1 hour after incubated inside absorbance-meter (set 2).
5) Five different supernatant solutions used, which correspond to the time points when they had been obtained during AI-2 preparation: 3, 4, 5, 6, 8 hours.
6) Control samples included
  * cell suspension alone

  * cell suspension with 50µl LB added initially (set 1)

  * cell suspension with 50µl LB after 1 hour incubation (set 2)

  * cell suspension with 50µl water added initially (set 1)

  * cell suspension with 50µl water added after 1 hour incubation (set 2)
Observation of LuxS(-) containing plsrA-YFP under fluorescence microscope
 "
"


