Agar
From 2008.igem.org
(Difference between revisions)
Riachalder (Talk | contribs) |
Riachalder (Talk | contribs) |
||
| Line 21: | Line 21: | ||
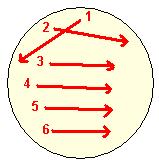
* Plate cultures by either pipetting culture medium onto agar and spreading using glass balls (flame-sterilise the neck of the glass bead jar first) (N.B. It is a good idea to do a large and a small volume (for example 25µl and 250µl). Alternatively streaking from another agar plate using an autoclaved toothpick will achieve isolated colonies that can be easily stabbed to be overnight cultures (see diagram 1). | * Plate cultures by either pipetting culture medium onto agar and spreading using glass balls (flame-sterilise the neck of the glass bead jar first) (N.B. It is a good idea to do a large and a small volume (for example 25µl and 250µl). Alternatively streaking from another agar plate using an autoclaved toothpick will achieve isolated colonies that can be easily stabbed to be overnight cultures (see diagram 1). | ||
* When plating a colony from one agar plate to multiple others (for example with different antibiotics), it is a good idea to first mix the colony in LB. Flame-sterilise an innoculation loop and then touch it to a place on the agar where no colonies are growing to cool it. Select an isolated colony, remove it using the loop and place in an Eppendorf tube containing 30μl LB. Gently mix the cells and LB with the loop, then use it to streak a line of liquid onto the prepared agar plates (see diagram 2). Ensure that the loop is flame-sterilsed before touching each new colony. | * When plating a colony from one agar plate to multiple others (for example with different antibiotics), it is a good idea to first mix the colony in LB. Flame-sterilise an innoculation loop and then touch it to a place on the agar where no colonies are growing to cool it. Select an isolated colony, remove it using the loop and place in an Eppendorf tube containing 30μl LB. Gently mix the cells and LB with the loop, then use it to streak a line of liquid onto the prepared agar plates (see diagram 2). Ensure that the loop is flame-sterilsed before touching each new colony. | ||
| + | |||
| + | [[Image:agar streaking technique.jpg]] | ||
'''Antibiotic Agar''' | '''Antibiotic Agar''' | ||
Revision as of 10:31, 18 September 2008
Contents 1 Basic Agar
2 Antibiotic Agar
3 Starch Agar
4 Sucrose Agar
5 Glucose Agar
Basic Agar
- Melt 100ml of nutrient agar in the microwave on low heat until clear.
- Leave to cool until the bottle can be handled comfortably.
- Mix well by swirling the bottle gently.
- Remove the lid of a sterile petri dish just enough so that the liquid can be poured onto the plate (a 100ml bottle of agar will be enough to pour 4 plates) and slowly pour the liquid agar making sure you do not make it too thin or too thick.
- Remove any bubbles by quickly moving the flame of a bunsen over the poured agar.
- Leave to set at room temperature for around 45 minutes.
- Once set, leave the plates in a fan-cupboard for 10 minutes with their lids partially off to dry out any condensation.
- Plate cultures by either pipetting culture medium onto agar and spreading using glass balls (flame-sterilise the neck of the glass bead jar first) (N.B. It is a good idea to do a large and a small volume (for example 25µl and 250µl). Alternatively streaking from another agar plate using an autoclaved toothpick will achieve isolated colonies that can be easily stabbed to be overnight cultures (see diagram 1).
- When plating a colony from one agar plate to multiple others (for example with different antibiotics), it is a good idea to first mix the colony in LB. Flame-sterilise an innoculation loop and then touch it to a place on the agar where no colonies are growing to cool it. Select an isolated colony, remove it using the loop and place in an Eppendorf tube containing 30μl LB. Gently mix the cells and LB with the loop, then use it to streak a line of liquid onto the prepared agar plates (see diagram 2). Ensure that the loop is flame-sterilsed before touching each new colony.
Antibiotic Agar
For positive selection of cells that have the antibiotic resistance gene.
- Add the required antibiotic once the melted agar is cool enough to touch. Be sure to check the stock antibiotic concentration first. For example, for kanamycin of stock concentration 25mg/ml, we added 40μl to the 100ml of nutrient agar.
Starch Agar
For negative selection of cells that have interruption of amyE and therefore cannot make amylase.
- Add 1g starch powder and 1g bacterial agarose powder to 100ml LB and proceed to the microwaving stage. This agar does not need to be left to cool before pouring.
Sucrose Agar
For negative selcetion of cells that have interruption of sacA and therefore cannot make sucrase.
Make up the following:
- 100mL SMM (a mixture of essential salts)
- 500μl glutamate (nitrogen source)
- 500μl tryptophan (essential amino acid)
- 500μl solution F (magnesiumn source)
- 100μl CAA (casamino acid)
- 3mL sucrose
- 1g bacterial agar
and proceed to microwaving stage.
Glucose Agar
Used as a control for -sacA cells.
Make up the following:
- 100mL SMM (a mixture of essential salts)
- 500μl glutamate (nitrogen source)
- 500μl tryptophan (essential amino acid)
- 500μl solution F (magnesiumn source)
- 100μl CAA (casamino acid)
- 2mL glucose
- 1g bacterial agar
and proceed to microwaving stage.
 "
"
