Team:UC Berkeley Tools/Project/Tutorial/PartsAndPlatesManager
From 2008.igem.org
| (One intermediate revision not shown) | |||
| Line 5: | Line 5: | ||
{{Template:ClothoTutorialVerticalMenu}} | {{Template:ClothoTutorialVerticalMenu}} | ||
| + | |||
| + | |||
| + | <p><br><br>[[Team:UC_Berkeley_Tools/Project/Tutorial/PoBoL|'''<<< Previous''']] | [[Team:UC_Berkeley_Tools/Project/Tutorial/AlgorithmManager|'''Next >>>''']]</p> | ||
<p><strong>9) Parts Manager and Plate Manager</strong></p> | <p><strong>9) Parts Manager and Plate Manager</strong></p> | ||
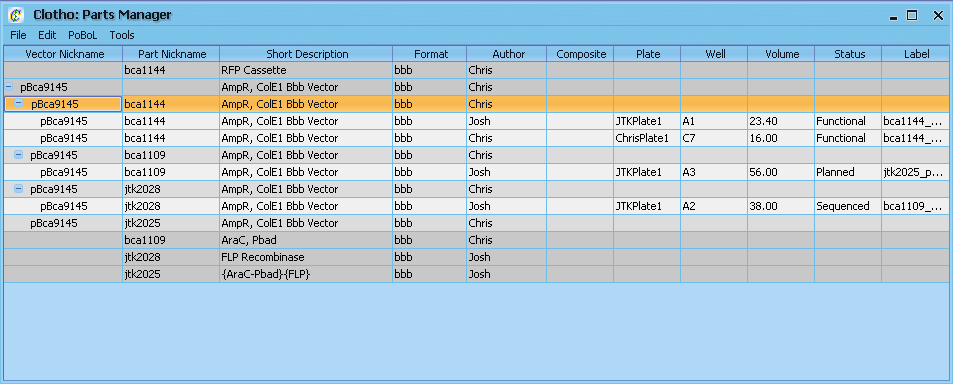
<p>Two Clotho connections so far utilize the PoBoL-based mySQL connection: the Parts Manager and the Plate Manager. On the Main Toolbar select "Parts Manager" from the Interfaces drop down menu, bring up the Parts Manager window. The Parts Manager allows you to look at BioBrick parts in the database. It contains a lot of information on each part, including the part and vector nicknames, the parts status, who submitted it, its location in the lab, the amount left, and more. In the future, you will be able to add, delete, and edit parts in the database through this window, as well as looking up more detailed information on the part.</p> | <p>Two Clotho connections so far utilize the PoBoL-based mySQL connection: the Parts Manager and the Plate Manager. On the Main Toolbar select "Parts Manager" from the Interfaces drop down menu, bring up the Parts Manager window. The Parts Manager allows you to look at BioBrick parts in the database. It contains a lot of information on each part, including the part and vector nicknames, the parts status, who submitted it, its location in the lab, the amount left, and more. In the future, you will be able to add, delete, and edit parts in the database through this window, as well as looking up more detailed information on the part.</p> | ||
| Line 10: | Line 13: | ||
<p>Close the Parts Manager, and on the Main Toolbar select "Plate Manager" from the Tools drop down menu, bringing up the Plate Manager window. The Plate Manager lets you keep track of the contents and locations of plates in the lab. From the drop down menu below the 'Zoom' buttons, select **PLATE NAME*, click the "Select" button, and select 'Yes' in the following pop-up box - this should load up a 96-well plate from the database. Information on the plate itself can be found in the 'Plate Information' box. Clicking on any of the occupied wells will fill out the 'Sample Information' box with information on the contents of the well. The data that gets displayed can be changed in the Plate Manager preferences window, by going to the Edit menu item, selecting "Preferences", and changing the the labels. For now, let's close the Plate Manager window and go back to the Main Toolbar.</p> | <p>Close the Parts Manager, and on the Main Toolbar select "Plate Manager" from the Tools drop down menu, bringing up the Plate Manager window. The Plate Manager lets you keep track of the contents and locations of plates in the lab. From the drop down menu below the 'Zoom' buttons, select **PLATE NAME*, click the "Select" button, and select 'Yes' in the following pop-up box - this should load up a 96-well plate from the database. Information on the plate itself can be found in the 'Plate Information' box. Clicking on any of the occupied wells will fill out the 'Sample Information' box with information on the contents of the well. The data that gets displayed can be changed in the Plate Manager preferences window, by going to the Edit menu item, selecting "Preferences", and changing the the labels. For now, let's close the Plate Manager window and go back to the Main Toolbar.</p> | ||
[[Image:Tut9b.PNG|center]] <p> </p> | [[Image:Tut9b.PNG|center]] <p> </p> | ||
| + | |||
| + | |||
| + | <p>[[Team:UC_Berkeley_Tools/Project/Tutorial/PoBoL|'''<<< Previous''']] | [[Team:UC_Berkeley_Tools/Project/Tutorial/AlgorithmManager|'''Next >>>''']]</p> | ||
Latest revision as of 01:47, 24 October 2008
9) Parts Manager and Plate Manager
Two Clotho connections so far utilize the PoBoL-based mySQL connection: the Parts Manager and the Plate Manager. On the Main Toolbar select "Parts Manager" from the Interfaces drop down menu, bring up the Parts Manager window. The Parts Manager allows you to look at BioBrick parts in the database. It contains a lot of information on each part, including the part and vector nicknames, the parts status, who submitted it, its location in the lab, the amount left, and more. In the future, you will be able to add, delete, and edit parts in the database through this window, as well as looking up more detailed information on the part.
Close the Parts Manager, and on the Main Toolbar select "Plate Manager" from the Tools drop down menu, bringing up the Plate Manager window. The Plate Manager lets you keep track of the contents and locations of plates in the lab. From the drop down menu below the 'Zoom' buttons, select **PLATE NAME*, click the "Select" button, and select 'Yes' in the following pop-up box - this should load up a 96-well plate from the database. Information on the plate itself can be found in the 'Plate Information' box. Clicking on any of the occupied wells will fill out the 'Sample Information' box with information on the contents of the well. The data that gets displayed can be changed in the Plate Manager preferences window, by going to the Edit menu item, selecting "Preferences", and changing the the labels. For now, let's close the Plate Manager window and go back to the Main Toolbar.
 "
"


