Team:UC Berkeley Tools/Project/Tutorial/SequenceView
From 2008.igem.org
| Line 8: | Line 8: | ||
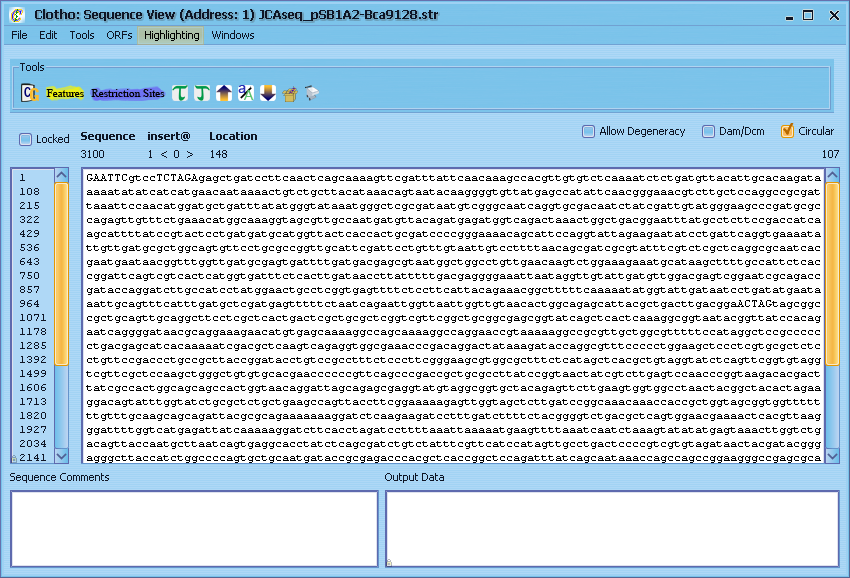
Now that we've got it everything looking spiffy, let's try out one of the main view of the tool - the Sequence View. On the main toolbar select "Sequence View" from the View drop down menu. This should bring up the Sequence View window. From here you have many options - you can load a sequence from a GenBank or FASTA file, drag in a sequence from another connection, copy and paste your chosen sequence, or enter it manually. Let's try opening a GenBank file ([http://openwetware.org/images/3/39/JCAseq_pSB1A2-Bca9128.str like this one], for example). Go to File, and select 'Load Sequence File' - this should bring up a window allowing you to choose what file you want to open. Go to the directory you saved the file to, select it, and click open (if the directory has many files in it, you can go to the 'Files of Type' drop down menu and filter it to only show GenBank or FASTA files). This will load the sequence into the current Sequence View window. From here, you can edit the sequence or perform a number of operations on it. But first, let's try adding some informative highlights to this plain text sequence. Go to the Highlighting menu, and select "Open Feature Library Connection".</p> | Now that we've got it everything looking spiffy, let's try out one of the main view of the tool - the Sequence View. On the main toolbar select "Sequence View" from the View drop down menu. This should bring up the Sequence View window. From here you have many options - you can load a sequence from a GenBank or FASTA file, drag in a sequence from another connection, copy and paste your chosen sequence, or enter it manually. Let's try opening a GenBank file ([http://openwetware.org/images/3/39/JCAseq_pSB1A2-Bca9128.str like this one], for example). Go to File, and select 'Load Sequence File' - this should bring up a window allowing you to choose what file you want to open. Go to the directory you saved the file to, select it, and click open (if the directory has many files in it, you can go to the 'Files of Type' drop down menu and filter it to only show GenBank or FASTA files). This will load the sequence into the current Sequence View window. From here, you can edit the sequence or perform a number of operations on it. But first, let's try adding some informative highlights to this plain text sequence. Go to the Highlighting menu, and select "Open Feature Library Connection".</p> | ||
[[Image:Tut3b.PNG|center]] <p> </p> | [[Image:Tut3b.PNG|center]] <p> </p> | ||
| + | |||
| + | |||
| + | <p><strong>6) Sequence View II</strong><br /> | ||
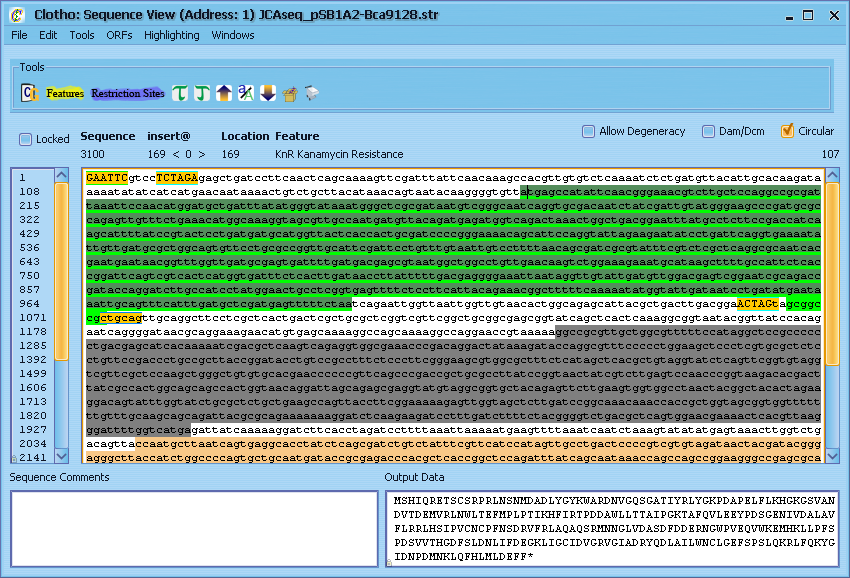
| + | Now let's play with some of the other basic tools in the Sequence View. Try pressing First, let's find an open reading frame - place your cursor anywhere in the sequence, go to the "ORFs" menu and select "Find Next ORF". Alternatively, you can use the shortcut and press [Ctrl + .]. This will place line a light green line underneath the next open reading frame found in the sequence after the cursor (if other alternate start codons are enabled in the preferences, their reading frames will be shown using yellow or red lines). Highlight this sequence with the mouse and select the "Translate" option from the "Tools" menu (or press [Ctrl + T]). The protein translation of this reading frame will be printed to the 'Output Data' window. Similiarly, if you select "Reverse Complement" [Ctrl + /], the reverse complement of the sequence will be printed. "Find Reverse ORF" and "Reverse Translate" operate in the same fashion, but they look at the reverse complement of the sequence. "UPPER CASE", "Switch Case", and "lower case" all operate on any portion of the sequence you care to highlight (case has no effect on sequence analysis and is treated as aesthetic). Highlighting a string of nucleotides also displays information like G-C content and melting temperature. Additionally, you can open up a tools menu under "Tools" [Ctrl + F] to peform find and replace operations on the sequence. Let's leave the Sequnce View for now - either select "Exit Sequence View" from the File menu or click the 'X' in the corner and select "Yes close" from the resulting pop-up box.</p> | ||
| + | [[Image:Tut6.PNG|center]] <p> </p> | ||
Revision as of 08:39, 20 October 2008
3) Sequence View I
Now that we've got it everything looking spiffy, let's try out one of the main view of the tool - the Sequence View. On the main toolbar select "Sequence View" from the View drop down menu. This should bring up the Sequence View window. From here you have many options - you can load a sequence from a GenBank or FASTA file, drag in a sequence from another connection, copy and paste your chosen sequence, or enter it manually. Let's try opening a GenBank file (like this one, for example). Go to File, and select 'Load Sequence File' - this should bring up a window allowing you to choose what file you want to open. Go to the directory you saved the file to, select it, and click open (if the directory has many files in it, you can go to the 'Files of Type' drop down menu and filter it to only show GenBank or FASTA files). This will load the sequence into the current Sequence View window. From here, you can edit the sequence or perform a number of operations on it. But first, let's try adding some informative highlights to this plain text sequence. Go to the Highlighting menu, and select "Open Feature Library Connection".
6) Sequence View II
Now let's play with some of the other basic tools in the Sequence View. Try pressing First, let's find an open reading frame - place your cursor anywhere in the sequence, go to the "ORFs" menu and select "Find Next ORF". Alternatively, you can use the shortcut and press [Ctrl + .]. This will place line a light green line underneath the next open reading frame found in the sequence after the cursor (if other alternate start codons are enabled in the preferences, their reading frames will be shown using yellow or red lines). Highlight this sequence with the mouse and select the "Translate" option from the "Tools" menu (or press [Ctrl + T]). The protein translation of this reading frame will be printed to the 'Output Data' window. Similiarly, if you select "Reverse Complement" [Ctrl + /], the reverse complement of the sequence will be printed. "Find Reverse ORF" and "Reverse Translate" operate in the same fashion, but they look at the reverse complement of the sequence. "UPPER CASE", "Switch Case", and "lower case" all operate on any portion of the sequence you care to highlight (case has no effect on sequence analysis and is treated as aesthetic). Highlighting a string of nucleotides also displays information like G-C content and melting temperature. Additionally, you can open up a tools menu under "Tools" [Ctrl + F] to peform find and replace operations on the sequence. Let's leave the Sequnce View for now - either select "Exit Sequence View" from the File menu or click the 'X' in the corner and select "Yes close" from the resulting pop-up box.
 "
"


