Team:Bologna/Biosafety
From 2008.igem.org
| HOME | PROJECT | TEAM | SOFTWARE | MODELING | WET LAB | LAB-BOOK | SUBMITTED PARTS | BIOSAFETY AND PROTOCOLS |
|---|
Contents |
What is biosafety?
Biosafety guidelines evolved as a protection for laboratorians in the field of microbiology, understanding the risks associated with various manipulations of agents transmissible by different routes. Different biosafety levels provide increasing attention to personnel and environmental protection.
There is a definite hierarchy of controls that need to be in effect. Upper level management must set the general tone that safety is a high priority. Crucial to safe working conditions are the various types of specialized equipment available to serve as primary barriers between the hazard and the laboratorian. These range from simple gloves and other personnel protective equipment to simple (sealed centrifuge heads) or complex (biosafety cabinets) containment devices.
Levels
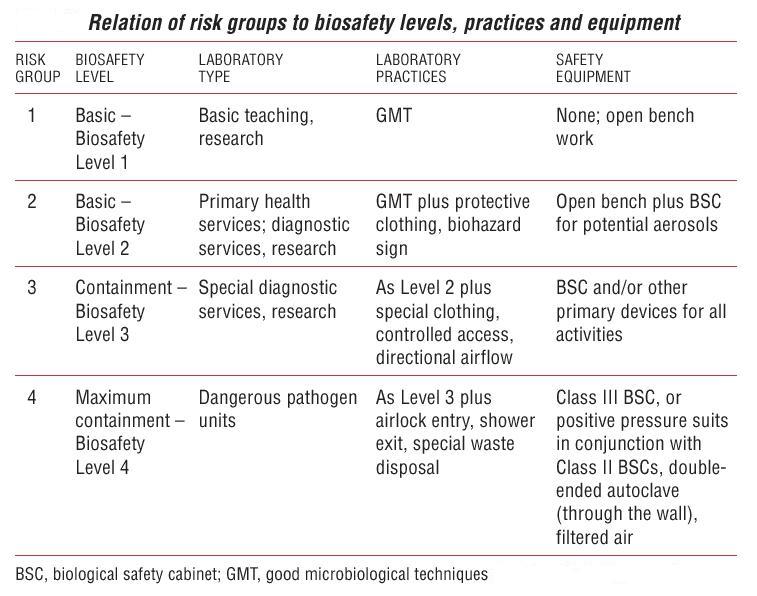
A Biosafety Level reperesents the biocontainment precautions required to isolate dangerous biological agents in an enclosed facility. Levels of containment range from the lowest biosafety level 1 to the highest at level 4.
Biosafety Level 1 (BSL1)
This level is suitable for work involving well-characterized hazards not known to consistently cause disease in healthy adult humans, and of minimal potential hazard to laboratory personnel and the environment.
It includes several kinds of bacteria and viruses [including canine hepatitis, Escherichia coli, varicella (chicken pox)], as well as some cell cultures and non-infectious bacteria. At this level precautions against biohazard are minimal, most likely involving gloves and some facial protection. The laboratory is not necessarily separated from the general traffic patterns in the building. Work is generally conducted on open benchtops using standard practices. Usually, "contaminated" materials are left in open (but separately indicated) rubbish receptacles. Decontamination procedures for this level are similar in most respects to modern precautions against everyday microorganisms (i.e.: washing one's hands with anti-bacterial soap, washing all exposed surfaces of the lab with disinfectants, etc). In a lab environment, all materials used for cell and/or bacteria cultures are decontaminated via autoclave. Laboratory personnel have specific training in the procedures conducted in the laboratory and are supervised by a scientist with general training in life science.
Biosafety Level 2 (BSL2)
This level is similar to Biosafety Level 1 and is suitable for work involving moderate potential hazard to personnel and the environment. It includes various bacteria and viruses that cause only mild disease to humans and are difficult to contract via aerosol in a lab setting, such as C. diff, hepatitis A, B, and C, influenza A, Lyme disease, dengue fever, Salmonella, mumps, Bacillus subtilis, measles, HIV, scrapie.
BSL-2 differs from BSL-1 in that:
- laboratory personnel have specific training in handling pathogenic agents and are directed by scientists with advanced training;
- access to the laboratory is limited when work is being conducted;
- extreme precautions are taken with contaminated sharp items;
- certain procedures in which infectious aerosols or splashes may be created are conducted in biological safety cabinets or other physical containment equipment.
Biosafety Level 3 (BSL3)
This level is applicable to clinical, diagnostic, teaching, research, or production facilities where work is done with indigenous or exotic agents which may cause serious or potentially lethal disease as a result of exposure by the inhalation route. It includes various bacteria and viruses that can cause severe to fatal disease in humans, but for which vaccines or other treatment exist, such as anthrax, West Nile virus, Venezuelan equine encephalitis, Eastern equine encephalitis, SARS, tuberculosis, typhus, Rift Valley fever, Rocky Mountain spotted fever, yellow fever.
Laboratory personnel have specific training in handling pathogenic and potentially lethal agents, and are supervised by competent scientists who are experienced in working with these agents in the lab. This is considered a neutral or warm zone.
All procedures involving the manipulation of infectious materials are conducted within biological safety cabinets or other physical containment devices, or by personnel wearing appropriate personal protective clothing and equipment. The laboratory has special engineering and design features.
It is recognized, however, that some existing facilities may not have all the features recommended for BSL3 (i.e., double-door access zone and sealed penetrations). In this circumstance, an acceptable level of safety for the conduct of routine procedures, (e.g., diagnostic procedures involving the propagation of an agent for identification, typing, susceptibility testing, etc.), may be achieved in a Biosafety Level 2 facility, providing
- the exhaust air from the laboratory room is discharged to the outdoors,
- the ventilation to the laboratory is balanced to provide directional airflow into the room,
- access to the laboratory is restricted when work is in progress, and
- the recommended Standard Microbiological Practices, Special Practices, and Safety Equipment for BSL3 are rigorously followed.
The decision to implement this modification of Biosafety Level 3 recommendations are made only by the laboratory director.
Biosafety Level 4 (BSL4)
This level is required for work with dangerous and exotic agents that pose a high individual risk of aerosol-transmitted laboratory infections, agents which cause severe to fatal disease in humans for which vaccines or other treatments are not available, such as Bolivian and Argentine hemorrhagic fevers, smallpox (there is a vaccine), Marburg virus, Ebola virus, Lassa fever, Crimean-Congo hemorrhagic fever, and other various hemorrhagic diseases.When dealing with biological hazards at this level the use of a Hazmat suit and a self-contained oxygen supply is mandatory. The entrance and exit of a Level Four biolab will contain multiple showers, a vacuum room, an ultraviolet light room, and other safety precautions designed to destroy all traces of the biohazard. Multiple airlocks are employed and are electronically secured to prevent both doors opening at the same time. All air and water service going to and coming from a BSL4 lab will undergo similar decontamination procedures to eliminate the possibility of an accidental release.
Agents with a close or identical antigenic relationship to BSL4 agents are handled at this level until sufficient data is obtained either to confirm continued work at this level, or to work with them at a lower level.
Members of the laboratory staff have specific and thorough training in handling extremely hazardous infectious agents and they understand the primary and secondary containment functions of the standard and special practices, the containment equipment, and the laboratory design characteristics. They are supervised by qualified scientists who are trained and experienced in working with these agents. Access to the laboratory is strictly controlled by the laboratory director.
The facility is either in a separate building or in a controlled area within a building, which is completely isolated from all other areas of the building. A specific facility operations manual is prepared or adopted. Building protocols for preventing contamination often uses negatively pressurized facilities, which, if compromised, would severely inhibit an outbreak of aerosol pathogens.
Within work areas of the facility, all activities are confined to Class III biological safety cabinets, or Class II biological safety cabinets used with one-piece positive pressure personnel suits ventilated by a life support system. The BSL4 laboratory has special engineering and design features to prevent microorganisms from being disseminated into the environment. The laboratory is kept at negative air pressure, so that air flows into the room if the barrier is penetrated or breached. Furthermore, an airlock is used during personnel entry and exit.
Biosafety in our project
In order to lower the risk of causing damages to health, and to protect the environment, our team enforced a sound laboratory practice. Every protocol was characterized by a risk index for researcher's, public and environmental safety. A higher index indicates more hazard and the need for specific precautions to be adopted during the execution of the protocol.
Our most dangerous practices concern the use of Ethidium Bromide, UV rays and genetically modified bacteria.
Ethidium Bromide and UV Rays
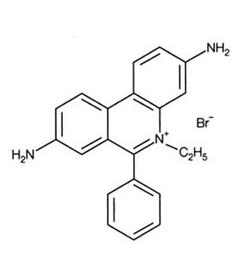
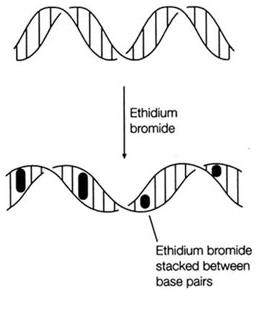
Ethidium Bromide (EtBr) is commonly used as a non-radioactive marker for identifying and visualizing nucleic acid bands in electrophoresis and in other methods of gel-based nucleic acid separation. EtBr is dark red, crystalline, non-volatile solid, moderately soluble in water, which fluoresces readily with a reddish-brown color when exposed to ultraviolet light (UV). Although it is an effective tool, its hazardous properties require special safe handling and disposal procedures.
Safety Precautions
EtBr is a mutagen and is moderately toxic after an acute exposure. It can be absorbed through skin, so it is important to avoid any contact with the chemical. It is also an irritant to the skin, eyes, mouth and upper respiratory tract. Good work practices can help to reduce hazardous exposure.
- To prevent inhalation exposure, work with EtBr powder or crystals in a fume hood. It is better to work with premixed EtBr solutions or tablets to avoid the direct handling of the powder.
- To prevent skin contact when working with liquid solutions, wear nitrile gloves, a laboratory coat, and safety goggles. Change gloves frequently.
- Review an EtBr Material Safety Data Sheet (MSDS) and Environmental, Health and Safety (EHS) fact sheet before handling the material.
- Wear eye protection and ensure that there is unobstructed access to an eyewash/shower unit in the work area.
- As with any chemical, to avoid ingestion do not eat or drink where EtBr is handled, processed, or stored.
- Always wash hands thoroughly after handling EtBr, even when gloves are used.
- Wear UV-blocking eyewear or work behind a UV shielding glass when using ultraviolet light to visualize EtBr.
Spills and Decontamination
- Use soap and water mixture (detergent solution) or 70% ethanol to wipe clean laboratory work surfaces contaminated with EtBr.
- Use a UV light to survey work surfaces in the laboratory to ensure that the EtBr has been removed.
Emergency Exposures
- Eye care - If EtBr comes in contact with the eyes, immediately flush them with copious amounts of cold or cool water for at least 15 minutes, preferably in emergency eyewash.
- Skin care - In the event of skin exposure, remove contaminated clothing and immediately wash the affected area with soap and copious amounts of cold or cool water for 15 minutes.
- If swallowed or inhaled - In the case of EtBr ingestion, obtain medical attention immediately. If EtBr dust is inhaled, move the victim to a source of fresh air.
UV side effects
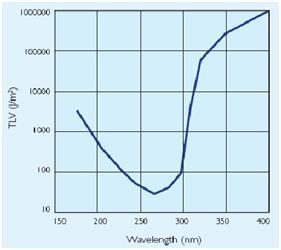
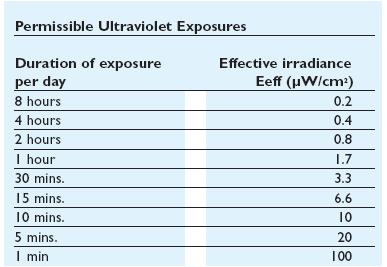
In addiction to the germicidal effect UV radiation can also cause erythema (reddening of the skin) and conjunctivitis (inflammation of the mucous membranes of the eye). Because of this, limit the exposure[Threshold Limit Values,ACGIH,1999-2000] according to irradiance of the ultraviolet-lamps (next figures).
Genetically modified E. coli
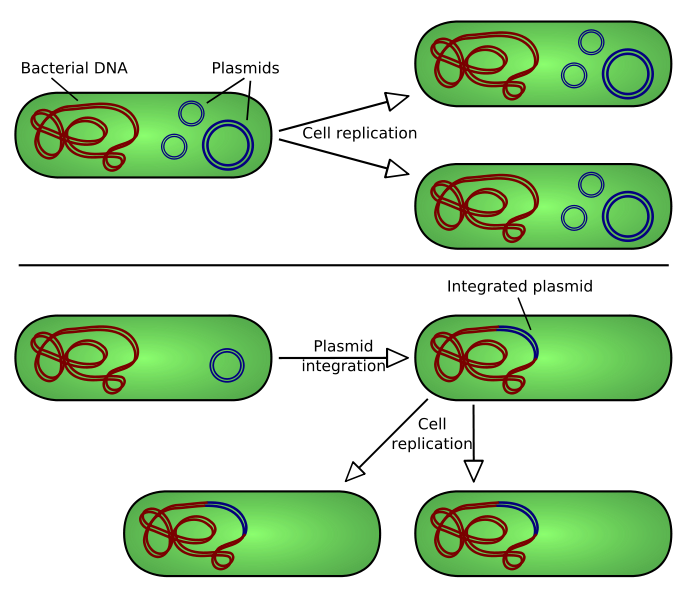
Our team used transient transformation techniques, allowing the inserted vector to remain into the host cell as an extrachromosomic fragment. In other words the vector does not integrate into the cellular genome. In this case the properties inducted by the transformation last about 72 hours.
Thus it was not necessary to develop techniques that allow the insulation -into the cellular culture- of the cells that completed the transformation process. This function is carried out by the action of some sequences contained in the vector with the gene of interest: the selection markers. Through genetic engineering techniques, vectors are filled with a gene -anticipated by a strong promoter that encourage its transcription- that resists to a particular antibiotic. The same antibiotic is inserted in the medium: if the vector has entered the cell it will confer to the bacteria resistance against the antibiotic. All the non-transformed cells will be killed.
A potential contamination of the environment producted by bacterial dispersion would not involve any biohazard. This is because there are no favorable conditions for the proliferation of transformed cells. Therefore the biosafety level maintains the unitary value.
Protocols
| Protocol | Biosafety level |
| Plates preparation | |
| Amplification | |
| Transformation | |
| Inoculation | |
| Miniprep | |
| Digestion reaction | |
| Gel preparation | |
| Electrophoretic run | |
| Gel extraction | |
| Ligation reaction | |
| Chemiocompetent cells | |
| Mediums and buffers | |
| Antibiotics stocks preparation | |
| IPTG stocks preparation | |
| Fluorescence test | |
| M9 supplemented media | |
Plates preparation
Biosafety level: 1
- Autoclave LB medium with 2% agar.
- Cool (at about 50°C, to prevent agar polymerization).
- Before pouring the plates add antibiotic (Ampicillin 1000x [ ] or Kanamicin 200x [ ]).
- Put about 20ml of medium per plate.
- Leave it solidify and store at 4°C.
Biobricks amplification
Biosafety level: 1
- Puncture a hole through the foil with a pipette tip (wash it everytime with bleach-distilled water-EtOH 95%) into the spot that corresponds to the Biobrick™-standard part that you want.
- Soak the paper in 5μl of TE buffer.
- Rest for 20 minutes at 50°C.
Transformation
Biosafety level: 1
- Thaw the competent cells in ice (do not refreeze).
- Dispense 80μl of cells into microfuge tubes on ice.
- Add 0.1-0.3μg of plasmidic DNA or the respective amount of the ligation reaction.
- Keep on ice for 30min.
- HeatShock at 42°C for 60sec without agitation.
- Keep on ice for 2min.
- Add 0.8ml of LB medium at room temperature.
- Incubate at 37°C for 1hr with agitation.
- Pellet the cells and discard most of supernatant, leaving about 100μl.
- Streak on plates containing appropriate antibiotics.
- Incubate the plates overnight at 37°C.
Inoculation
Biosafety level: 1
- Put 5 ml of LB media in a 50ml tube.
- Add the appropriate antibiotic.
- Pick one colony from the plate with the inoculation loop
- Put cells in solution.
- Incubate the plates overnight (12 hours) at 37°C.
Miniprep
Biosafety level: 1
- Pellet for 10 mins at 4400 rpm and discard most of supernatant.
- Resuspend pelleted bacterial cells in 250μl of Buffer P1 and tranfer to a microcentrifuge tube.
- Add 250μl of Buffer P2 and mix thoruoghly by inverting the tube 4-6 times.
- Add 350μl of Buffer N3 and mix immediately and thoruoghly by inverting the tube 4-6 times.
- Centrifuge for 10 min at ~18,000 x g in a table-top microcentrifuge.
- Apply the supernatant (from step 4) to the QIAprep spin column by decanting or pipetting.
- Centrifuge for 30-60 s. Discard the flow-though.
- Recommended: Wash the QIAprep spin column by adding 0.5 ml of Buffer PB and centrifuging for 30-60 s. Discard the flow through.
- Wash QIAprep spin column by adding 0.75ml of Buffer PE and centrifuge for 30-60 s.
- Discard the flow through and centrifuge for an additional 1 min to remove residual wash buffer.
- To elute DNA, place the QIAprep column in a clean 1.5 ml microcentrifuge tube. Add 30μl of Buffer EB (or water) to the center of each QIAprep spin column, let stand for 1 min, and centrifuge for 1 min.
Digestion reaction
Biosafety level: 1
- E/S cut
- enzyme 1 --> ECO R1
- enzyme 2 --> SPE
- buffer --> ECO R1
- X/P cut
- enzyme 1 --> Xba
- enzyme 2 --> Pst 1
- buffer --> 3
- S/P cut
- enzyme 1 --> SPE
- enzyme 2 --> Pst 1
- buffer --> 2
- E/P cut
- enzyme 1 --> ECO R1
- enzyme 2 --> Pst 1
- buffer --> ECO R1
- Mix:
- 0.5 μl of BSA
- 0.5μl of each enzyme
- 3μl of buffer
- 5μl of DNA
- 20.5μl of H2O(most pure)
- Spinning down.
- 1h at 37 °C.
- 20 min at 80 °C to block the enzymatic action.
- Put in ice.
- Start run preparation.
Gel preparation
Biosafety level: 2
- 150ml of Buffer TBE 1x.
- Add the appropriate quantity of Agarose for the desired thickness
- 0.7%= 1g of agarose
- 0.7-1% general( from 200 bases to 3Kb)
- 0.5% big pieces (6-7 Kb)
- 2-3% small pieces (100 bases)
- Microwaves for 2 min.
- Cool down under flowing water.
- Add 10μl of EtBr.
- Prepare the gel tray and set in place the wide-thoot comb.
- Pour the gel in the gel tray (work in the hood for safety purpose)
- Get rid of bubbles and let solidify.
Electrophoretic run
Biosafety level: 2
- Put the solidified gel in the apposite run container.
- Check that TBE fully covers the gel.
- Gently extract the comb.
- Add the Loading buffer in the digested DNA.
Loading: substance that loads the sample with dye so that we can see the evolution of race and weight the DNA so that deposits in the well; concentrated at 6x.
- Make the deposit in the wells of the samples and loading of reference (a part of loading should be prepared to scale by reference).
- Close the container.
- Start the run:
- 50/100 V --> until separate bands
- 120 V --> until half run
- 140 V--> until end of run.
Gel extraction
Biosafety level: 2
- Excise the DNA fragment from the agarose gel with a clean, sharp scalpel.
- Weigh the gel slice in a colorless tube. Add 3 volumes of Buffer QG to 1 volume of gel (100 mg ~ 100 μl).
- Incubate at 50°C for 10 min (or until the gel slice has completely dissolved). To help dissolve gel, mix by vortexing the tube every 2-3 min during the incubation.
- After the gel slice has dissolved completely, check that the color of the mixture is yellow (similar to Buffer QG without dissolved agarose).
- Add 1 gel volume of isopropanol to the sample and mix.
- Place a QIAquick spin column in a provided 2 ml collection tube or into a vacuum manifold.
- To bind DNA, apply the sample to the QIAquick column and centrifuge for 1 min or apply vacuum to the manifold until all samples have passed through the column. Discard flow-through and place the QIAquick column back into the same tube.
- Recommended: add 0.5 ml of Buffer QG to QIAquick column and centrifuge for 1 min or apply vacuum. Discard flow-through and place the QIAquick column back into the same tube.
- To wash, add 0.75 ml of Buffer PE to QIAquick column and centrifuge for 1 min or apply vacuum. Discard flow-through and place the QIAquick column back into the same tube.
- Centrifuge the column in a 2 ml collection tube (provided) for 1 min at 18,000 x g.
- Place QIAquick column into a clean 1.5 ml microcentrifuge tube.
- To elute DNA, add 30 μl of Buffer EB (10 mM Tris-Cl, pH 8.5) or water to the center of the QIAquick membrane and centrifuge the column for 1 min. Alternatively, for increased DNA concentration, add 30 μl of elution buffer to the center of the QIAquick membrane, let the column stand for 1 min and then centrifuge for 1 min.
- If the purified DNA is to be analyzed on a gel, add 1 volume of Loading Dye to 5 volumes of purified DNA. Mix the solution by pipetting up and down before loading the gel.
Ligation reaction
Biosafety level: 1
- Ligation with one insert and one vector --> f.v.=20μl
- 8μl of insert
- 4μl of vector
- 1μl of T4 ligase
- 4μl of Buffer 5X
- 3μl of H2O mQ
- Ligation with two insert and one vector --> f.v.=30μl
- 4μl of vector
- 8μl of insert 1
- 8μl of insert 2
- 1μl of T4 ligase
- 6μl of Buffer 5X
- 3μl of H2O mQ
- Conservation:
- 40 min at Tamb, or
- 3 hours at 15°C
Chemiocompetent cells
Biosafety level: 1
- Take some colonies of DH5α cells from a fresh streaked plate and inoculate into 125ml of Soc medium.
- Grow the cells overnight at 25°C (it is advised to grow them slowly in order to have them better synchronized). It takes approximately 20 hours. It is advisable to grow the cells at 25°C overnight and then to shift them at 37°C. Bacteria are ready for harvesting when OD600 is between 0.37 and 0.4. Higher OD will lead to less competent cells (it is important to harvest the bacteria when they are still in the logarithmic phase of growth).
- Spin down the cells (at maximum speed) at 4°C for 10 min.
- Re-dissolve the pellet in 40ml of Transformation buffer.
- Incubate on ice for 10 min.
- Spin down the cells (at maximum speed) at 4°C for 10 min.
- Re-dissolve the pellet in 10ml of Transformation buffer.
- Add 700μl of DMSO.
- Aliquot (200μl) and freeze at -80°C.
Mediums and buffers
Biosafety level: 1
- Soc medium
- To prepare 1l of SOC medium dissolve in ultrapure water:
- Tryptone 4g
- Yeast extract 1g
- 1M NaCl 2ml
- 1M KCl 0.5ml
- 5M NaOH 200μl to adjust the pH to 6.8
- After autoclaving add 2ml each of 2M Mg-salt (1M MgSO4 and 1M MgCl) and 2M glucose.
- LB medium
- To prepare 1L of LB medium dissolve in ultrapure water:
- Tryptone 10g
- Yeast extract 5g
- NaCl 10g
- 5M NaOH 200μl
- Autoclave and store at room temperature.
- Transformation Buffer
(always made fresh)
- To prepare 100ml dissolve in ultrapure water:
- (15mM) CaCl2 0.2205g
- (250mM) KCl 1.864g
- (10mM) Pipes 0.302g
- Adjust pH with KOH to 6.7.
- Add (55mM) MnCl2 (0.89g of MnCl2x2H2O).
- Filter with 0.22μm filter.
- M9 medium
- Dissolve 56.4g in 1l of distilled water.
- Autoclave for 15 min at 121°C.
This convenient 5x concentrate can be stored and diluted as needed to prepare 5l of 1x M9 minimal salts. For M9 minimal medium:
- Aseptically dilute 200ml of M9 minimal salts, 5x[ ] with 800mL of sterile water, if necessary, cool to 45-50°C.
- Aseptically add 20ml of sterile 1M glucose and 2mL of sterile 1M magnesium solfate to prepare 1l of M9 minimal medium.
- If desired aseptically add 0.1ml of 1M sterile calcium chloride to the M9 minimal medium. M9 minimal medium may also be supplemented with the appropriate amino acids.
Antibiotics stocks preparation
Biosafety level: 1
- Ampicillin
- Dissolve ampicillin in ultrapure water 100mg/mL (stock 1000x [ ], working concentration100 μg/mL).
- Aliquot and store at -20°C.
- Kanamicin
- Dissolve Kanamicin in ultrapure water 10mg/mL (stock 200x [ ], working concentration 50μg/mL).
- Aliquot and store at -20°C.
IPTG stocks preparation
Biosafety level: 1
- IPTG (Isopropyl β-D-1-thiogalactopyranoside) 100mM stocks preparation for Plac induction (IPTG MW=238.31):
- 0.476g in 20ml of ultrapure water. Working concentration 1mM
Fluorescence test
Biosafety level: 1
- Growth O/N for 15h in LB (5ml) of:
- transformed E. coli with appropriate antibiotic;
- E. coli.
- All measures must be done in M9 with OD=1.2.
- The day after, in the morning, measure OD.
- To obtain OD=1.2:
- centrifuge 4ml of bacterial culture at 4400rpm for 3min at 25°C;
- discard the supernatant;
- resuspend the cell pellet in 6ml of M9 medium with glucose and appropriate antibiotic (1000x [ ]).
- Measure OD: adjust OD to 1.2 through further dilution or cell growth.
- Adjust PMT offset with untransformed E. Coli.
- Test culture fluorescence before IPTG induction.
- IPTG induction:
- centrifugate bacteria culture at 4400rpm for 3min at 25°C;
- discard the supernatant;
- resuspend cell pellet in M9 medium and 2mM IPTG with appropriate antibiotic (1000x [ ]);
- Incubate at 37°C.
- Test fluorescence after 10min, 20min, 30min, 1h, 2h.
M9 supplemented media
Biosafety level: 1
For 1L of 1X media
- 200 mL 5X M9 minimal salts
- Dissolve 56.4 g Bacto M9 minimal salts, 5X from Difco in 1L H2O
- Separate into 200 mL aliquots
- Autoclave to sterilize. 121°C for 15 minutes.
- 34 mL 10 mg/mL thiamine
- Dissolve 10 mg per mL of H2O
- Use a 0.22 μm filter to filter-sterilize
- 10 mL 40% glycerol
- Add 80 mL glyerol to 120 mL of H2O
- Autoclave to sterilize
- 20 mL 10% Casamino acids
- Dissolve 50 g Bacto Casamino acids from Difco in 500 mL H2O
- Autoclave to sterilize
- 2 mL 1M MgSO4
- Dissolve 24.65 g MgSO4·7H2O in 100 mL H2O
- Autoclave to sterilize
- 100 μL 1M CaCl2
- Dissolve 14.7 g CaCl2·2H2O in 100 mL H2O
- Autoclave to sterilize
- 733.9 mL H2O
- Sterilize deionized water in autoclave
Combine above solutions using sterile technique. (May notice some precipitation during preparation but precipitate should go back into solution once volume is brought up to 1L with sterile H2O.) Add antibiotic as appropriate and store at 4°C
Bibliography
- Richmond, JY and RW McKinney, 1993: Biosafety in Microbiological and Biomedical Laboratories. US Department of Health and Human Services, CDC/NIH, 3rd Edition. US Government Printing Office, Washington, DC.
- US Department of Labor, Occupational Safety and Health Administration, 1991. Occupational Exposures to Bloodborne Pathogens, Final Rule. Fed. Register 56:64175-64182.
- Richmond, JY and RW McKinney, 1995: Primary Containment for Biohazards: Selection, Installation and Use of Biological Safety Cabinets. US Department of Health and Human Services, CDC/NIH.. US Government Printing Office, Washington, DC.
- Council Directive 90/679/EEC of 26 November 1990 on the protection of workers from risks related to exposure to biological agents at work, OJ No. L 374, p. 1).
- Manuel S. Barbeito; Richard H. Kruse. "A History of the American Biological Safety Association". American Biological Safety Association. Retrieved on 2008-08-14.
- "Biosafety History,Recombinant DNA Molecules,Hybrid Organisms,NIH Guidelines,Bacillus Subtilis". Molecular-Plant-Biotechnology.info. Retrieved on 2008-08-14.
 "
"
