Team:Heidelberg/Human Practice/Phips the Phage/Technical Backround
From 2008.igem.org


Technical Background Information
Molecular Cloning
Molecular cloning is a procedure to isolate a defined DNA sequence and obtain multiple copies of it in vivo - which means in a living cell, in our case a bacterial cell. So the term cloning refers to the amplifying of a DNA sequence, but it is also often used to describe the procedure of engineering a given DNA sequence and thereby altering it. This is not far fetched, because this engineering procedure also includes an essential amplifying step. Cloning is utilized in a wide array of biological experiments and it is one of the most important techniques in biotechnology and in synthetic biology. We constantly used molecular cloning in our project.
What I want to explain to you in more detail here is how a given DNA sequence is altered in order to encode for new properties. In most cases proteins are responsible for certain properties (see Gene and Proteins), and therefore the DNA sequence of genes encoding proteins is altered, added or removed from the engineered DNA sequence.
So let me describe this procedure in greater detail, explaining the example of how to get the information for a fluorescent protein into a bacterial plasmid.
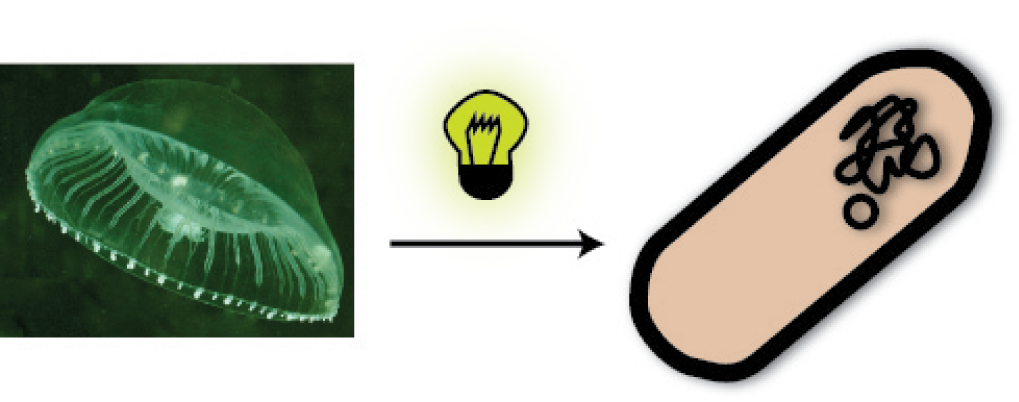
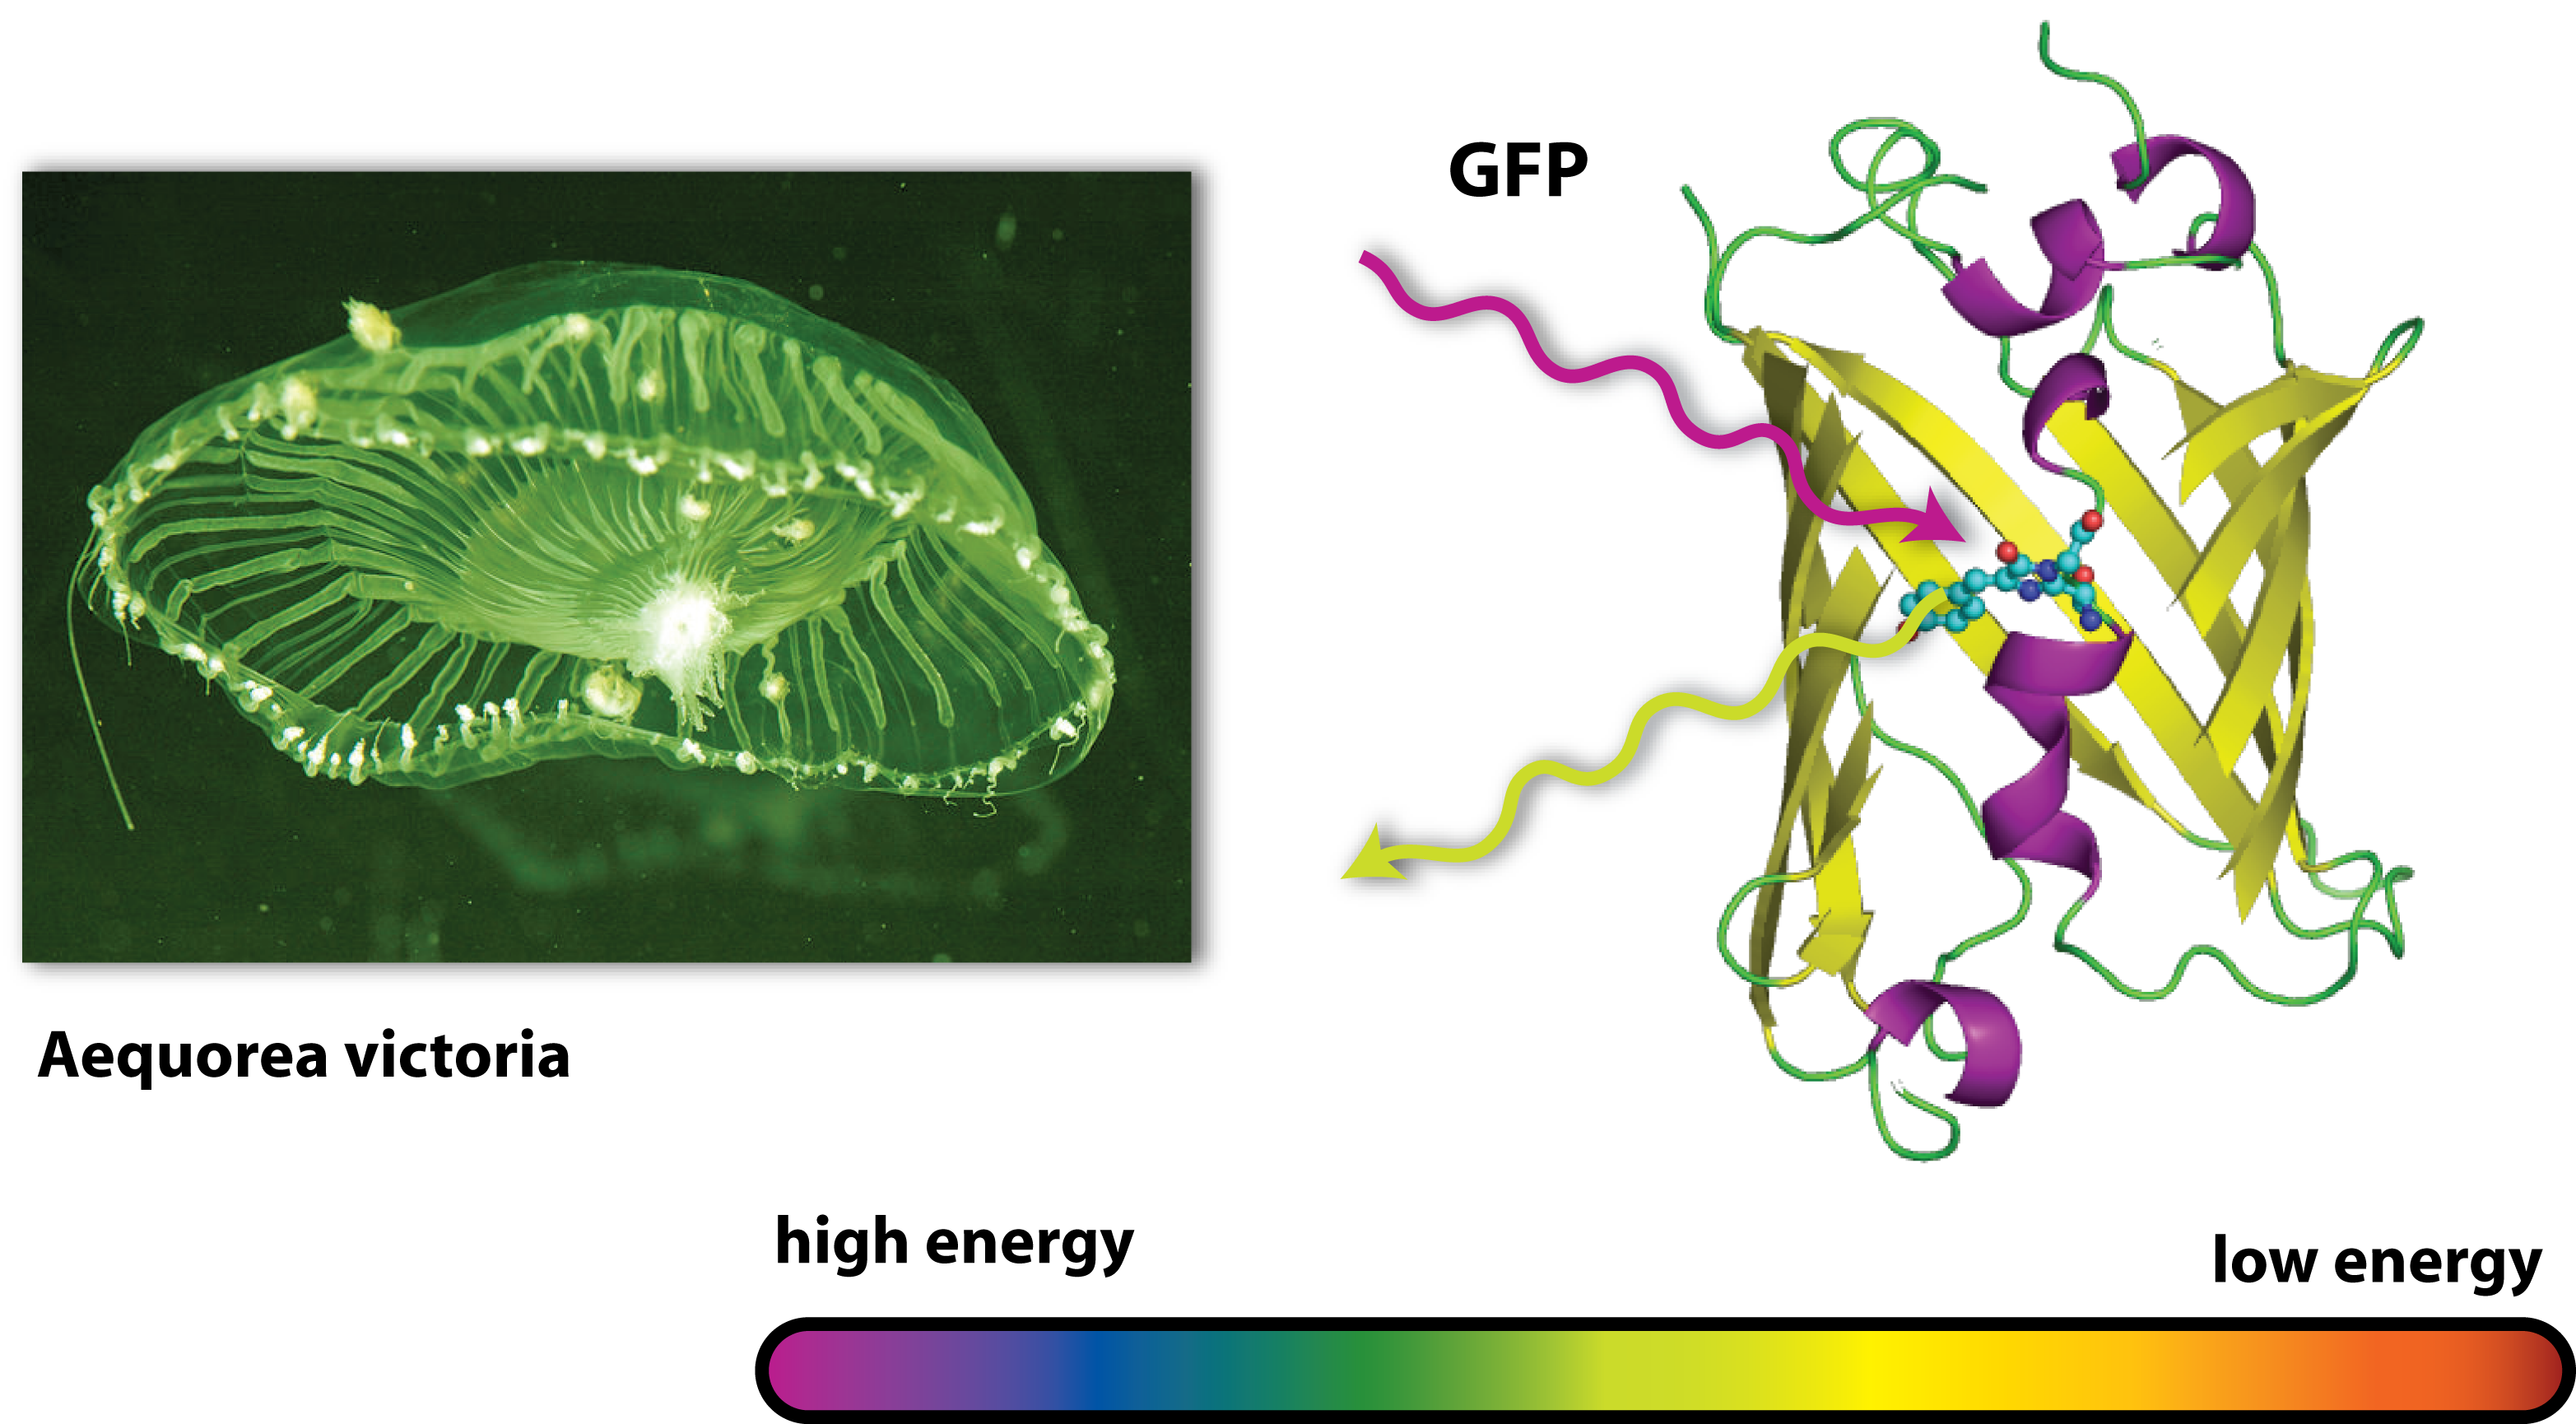
You ask yourself what a fluorescent protein is? Well, it is a protein, which is able to absorb light and emit light of lower energy and thereby glow. One protein with this feature is taken from a jellyfish and called Green Fluorescent Protein (GFP). It is the oldest and most broadly used fluorescent protein in biotechnology. Because it had such a great impact on this science and improved it a lot, this year’s Nobel Prize in chemistry was awarded for the discovery of GFP and its applications. If GFP is made by a cell and you illuminate this cell with UV-light, you can see a green light coming from this cell.
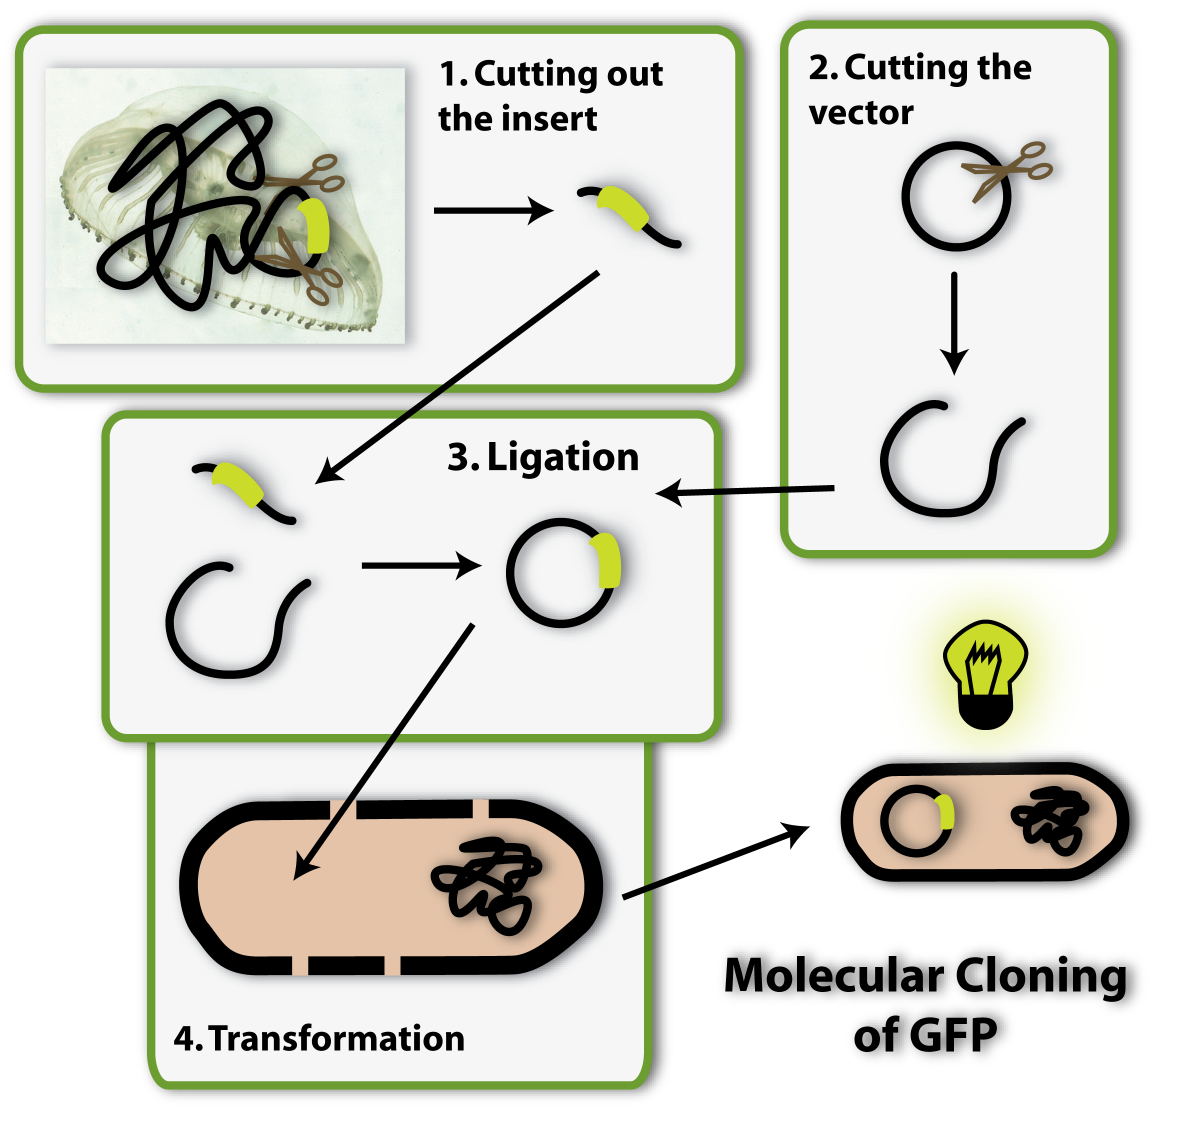
So imagine you made the discovery of GFP and found the sequence in the genome of this jellyfish, which encodes for the protein. Now you want this protein to be produced in a bacterial cell, so you can visualize it as described above. How do you proceed? You have to isolate the DNA encoding the GFP (the insert) and clone it into a bacterial plasmid (the vector), so that it is amplified and expressed. [back]
Get the DNA
How do we get the DNA? There are three major possibilities: Cut it out of the original DNA, replicate it via PCR (Polymerase Chain Reaction) or synthesize it from scratch. [back]
Restriction enzymes
Naturally there exist proteins, which are able to cut DNA. They are called restriction enzymes. They work by cutting the bonds between two nucleotides of the DNA strands and thereby create two new ends of the double helix. But restriction enzymes do not cut the DNA at random points, but they need signal sequences to get active. Those are called restriction sites and only at those sites the enzymes can bind and cut the DNA. So restriction enzymes provide a tool to cut DNA sequences in defined locations. Organism derived DNA sequences have a great number and variety of restriction sites. Over 3000 restriction enzymes have been studied in detail, and more than 600 of these are available commercially and are routinely used for DNA modification and manipulation in laboratories. The possibility to find suitable restriction sites to excise a certain part of DNA is generally very high. [back]
Polymerase Chain Reaction
This technique uses enzymes which are called DNA-polymerases. They are able to amplify a piece of DNA (like the polymerases that amplify our genome if a cell divides). They do this so called DNA replication in putting complementary nucleotides to a single DNA strand, thereby complementing it. If a DNA double strand is separated into two single ones, the DNA polymerase can complement the single ones and make them into double strands again. If they are separated anew (now we are having four single strands), the polymerase will again complement them, and so on. By constantly separating double stranded DNA and complementing them with the help of DNA polymerases, you can exponentially increase the amount of the given DNA fragment. Because the newly made DNA strands are serving as templates for the next amplifying circle, the reaction is called a ‘chain reaction’.
But one thing is very important to know: DNA polymerases need a starting point for the complementation. They need a small part of double stranded DNA, where they can start to add nucleotides to. Genetic engineers provide this starting point in the form of so called primers: These are small pieces of DNA which are complementary to parts of the DNA-strands to amplify. So they form small sections of double stranded DNA. By taking primers, that flank the DNA sequence which carries the gene of interest, the DNA polymerase will only amplify this flanked sequence. So by adding the right primers to the reaction, you can get the insert you need. Naturally, to take the right primers you need to know parts of or the whole sequence of the gene of interest. With the help of the primers you can also add restriction sites at the ends of the prospective insert. They will be important in a later step.
The last question you may ask is: How are the DNA strands separated? This is done by heating the DNA. At high temperatures (>70°C) the bonds between the bases that hold together the double strand are loosened and the strands separate. Right, now you have to ask the real last question? How can enzymes survive these temperatures and not denature like most proteins? The DNA polymerases taken for this reaction originate from Bacteria which live in very hot environments like thermal springs. Therefore they evolved enzymes which are not only able to survive high temperatures, but also work very efficiently.
To sum this technique: DNA strands are amplified by many cycles of heat separation (or denaturising) DNA double strands into single ones and subsequently complementing these single strands via a DNA polymerase. [back]
Synthesis from scratch
It is also possible to synthesise the insert with the gene of interest from scratch out of nucleotides. Therefore you have to know the complete sequence you want to make. You also have to add restriction sites at the end.
So now we have the insert with the gene of interest, in our case the GFP, how do we get this into the bacterial vector? From all I have told you, you can make an elaborate guess!
Right, we can again use restriction enzymes to cut the vector open and have to new DNA ends in the vector. All we have left to do is to link these ends to the two ends of the insert and we have put the insert into the vector. But how is this done?
[back]
Ligation
Therefore I have to explain another characteristic of restriction enzymes to you: The ends of the DNA, which have been cut by restriction enzymes, have a very important property: They are able to bind to other DNA ends, which have been cut by the same enzyme. You can imagine this to be because restriction enzymes cut a certain pattern into the DNA ends. Do you remember scissors which cut different patterns, like zigzag or waves into paper from when you where young? Restriction enzymes figuratively work like this: Only DNA ends, which have been created by the cut of the ‘zigzag enzyme’, have a zigzag pattern and can therefore bind to each other.
So if you cut your vector with a ‘zigzag enzyme’ and your insert has also been cut with a ‘zigzag enzyme’, the ends can bind to each other and the insert can thereby be put into the vector. This is why it is very important to have the right restriction sites at the ends of your insert.
The last step which is needed is to fix the bonds between the ends of the insert and of the vector, so they won’t open up again. An enzyme called Ligase is able to do this.
Now we have the vector with the insert ready. The next step of molecular cloning is to get this vector into bacterial cells, so they can amplify it and produce the protein of interest (GFP). [back]
Transformation
This is how the procedure of getting a plasmid vector into a bacterial cell is called. There are various techniques to obtain this aim, and they all have a common strategy: The cell wall and plasma membrane of the bacterial cells are temporarily perforated – this can be done via electric pulses or high concentrations of specific salts. The results are always the same. Through the holes in the bacterial cell walls, the plasmids which are given into the medium with the bacteria can enter into the bacterial cells.
Now, all that has to be done is to let the bacteria grow and amplify the plasmids. Well, its almost all that has to be done. There is one last important point. Since the efficiency of the transformation is very low, only few of the bacterial cells will grow have the plasmid with the GFP gene. To find these few positives again, you have to apply a selection method to these from those not successfully transformed. [back]
Selection
In our case this is very easy: You can just watch your cells illuminated with UV-light and you will see which ones have the GFP protein, for they will glow green. If you are not as lucky as we are and have cloned a gene of interest, which cannot be visualized so easy, you have to use other selection methods. Generally, the transformed cells are selected via antibiotic resistance: Therefore an antibiotic resistance gene is added to the bacterial vector, which enables the transformed bacteria to survive, if antibiotics are present in the culture media. All untransformed cells die due to the added antibiotics, because they do not have resistant genes, which neutralize the deathly power of the antibiotics.
After the selection and growing of the transformed cell, the plasmids with the gene of interest can be isolated via minipreparation and checked via Agarose gel electrophoresis. With the isolated plasmids, a new round of engineering could start, too. [back]
Minipreparation
After being given a theoritcal introduction, the pupils carry out a plasmid minipreparation using a standard kit.
Theoritcal background:
All synthetic biologists in the lab need plasmids as very important tools for their work. You can find them in bacterial cells – either naturally, or put in there by scientists. The bacteria amplify the plasmids in their cells (they replicate them, meaning they make identical copies) and of course they multiply the total amount of plasmids by growing – more bacteria means more plasmids on the whole. If we want to work with these plasmids, like checking whether they are the right ones or engineering them, we need to get them out of the bacteria. Therefore we need plasmid preparation.
The procedure is simple, but honestly, it is not very convenient for the bacteria: We need to destroy them; scientists say to lyse them, to set the plasmids free together with the other contents of the cell. Then you will have a mixture of DNA (chromosome and plasmids), RNA, proteins and others cell components. But you only need the plasmid DNA in this case, everything else has to be separated from it, because the rest can have a negative effect on further applications.
The method we mostly use in the laboratory to isolate plasmids is called alkaline lysis. This classical method is today standardized. Like the name implicates, you need alkaline agents for the lysis of the cell. Additionally, you use detergents, to break the cell wall and lyse the cells.
[back]
1. Lysis
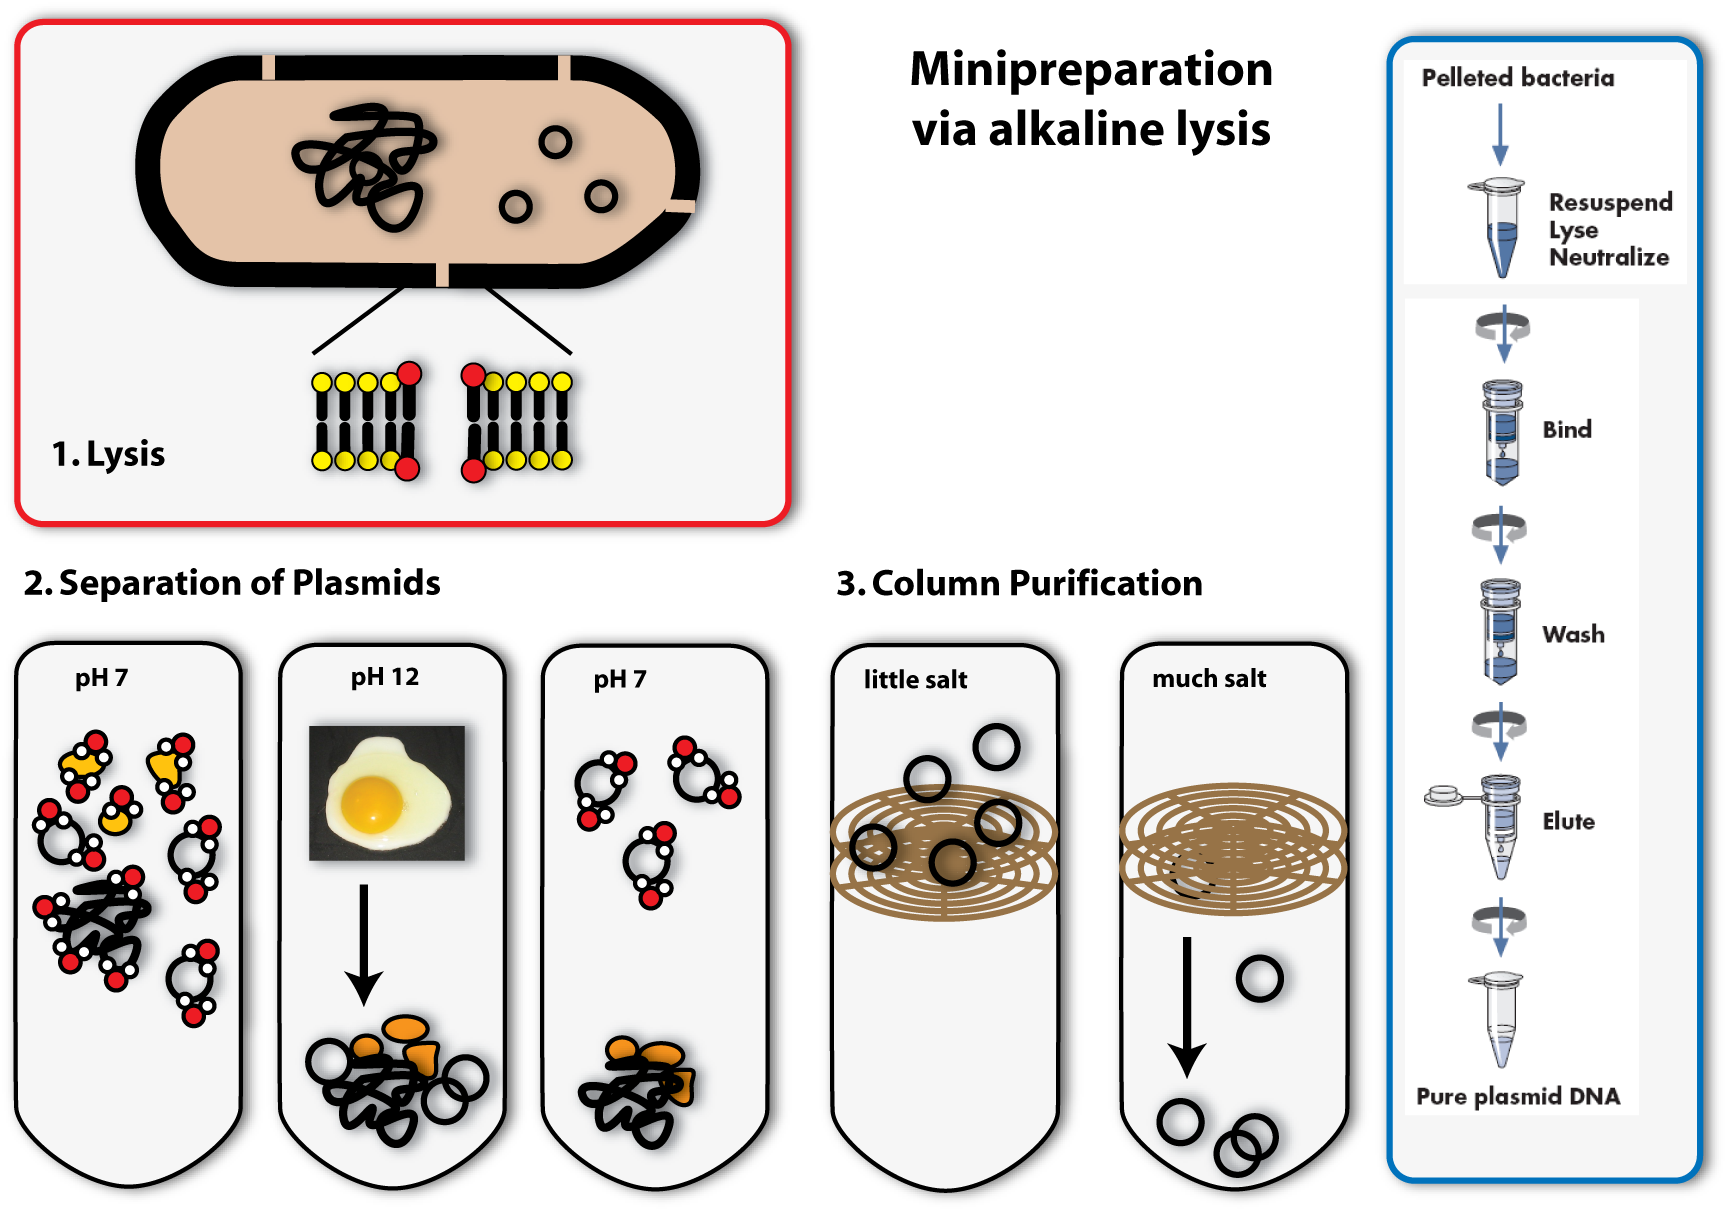
You can, for example, also find detergents in washing agents. There they help to remove grease spots. This works as follows: Detergents have a very similar structure to lipids. They therefore can mix with them and loose their connection to fibres of the clothes. In Bacteria, they act in a very similar way: They mix with the lipids that form the bilayer of the plasma membrane and destroy there ordered structure. This is how they make holes in the plasma membrane, which leads to the lysis of the cell. [back]
2. Precipitation and separation of proteins and chromosomal DNA
Now we come to the alkaline part of this procedure: In adding sodium hydroxide (NaOH) to the solution, the pH is increased from roughly 7 to 12. Because this is a huge contrast to the normal physiological pH, proteins and DNA denature and change their conformation. RNA is degraded. Proteins and DNA, which are denatured cannot be soluted any more and precipitate. You all know the phenomenon of denatured proteins from making fried eggs: The egg changes its consistency if you heat it and gets hard – this is due to the denaturising proteins. The same effect as heat, have acids or bases (like NaOH). In denatured DNA, the two strands get separated from each other.
The trick the alkaline method uses, to separate the plasmid DNA from the chromosomal DNA and the proteins, is to lower the pH again by adding acid (for example potassium acetate) to the solution. If the pH approximates the physiological one, the plasmids are able to renature first, because they are small and the two DNA strands find each other with a much higher possibility than the ones of the big chromosome. Therefore if you keep the renaturising step short, only the plasmids are able to build double helices and solute again. The chromosomal DNA and the proteins stay precipitated. They can be separated from the plasmids by centrifugation. (The white solids on the tube after centrifugation are the precipitated proteins, DNA and other cell components. The plasmid DNA is soluted in the clear supernatant.) [back]
3. Binding of DNA
Now how do we get the plasmids out of this salty solution (remember we put a lot of salts to the solution to first rise, then lower the pH) into a clear one that can be used for further applications? You could precipitate the plasmids like we did with the proteins before, but there is another possibility, which is widely used today: You bind the DNA to a solid phase. This often consists of silica, which can be used in a bead like form, but in most cases, it is included in a column integrated in an eppendorf tube. The DNA can bind to the silica column, if the solution is very salty. If you centrifuge, the salty solution is drawn through the column into the tip of the tube and the DNA remains bound to the column. [back]
4. Eluation of the plasmids
In the last step, you eluate the DNA from the column, meaning you loosen the bonds between DNA and silica and solute the DNA again. This is possible with every solution containing low or no salt at all. You can take water, for example. You put it on the column, centrifuge again, but this time the DNA will also be drawn through the column into the tip of the tube together with the water. You can then proceed to work with your purified plasmids: you can, for example, check, whether you have isolated the right one using agarose gel electrophoresis. [back]
Agarose Gel Electrophoresis
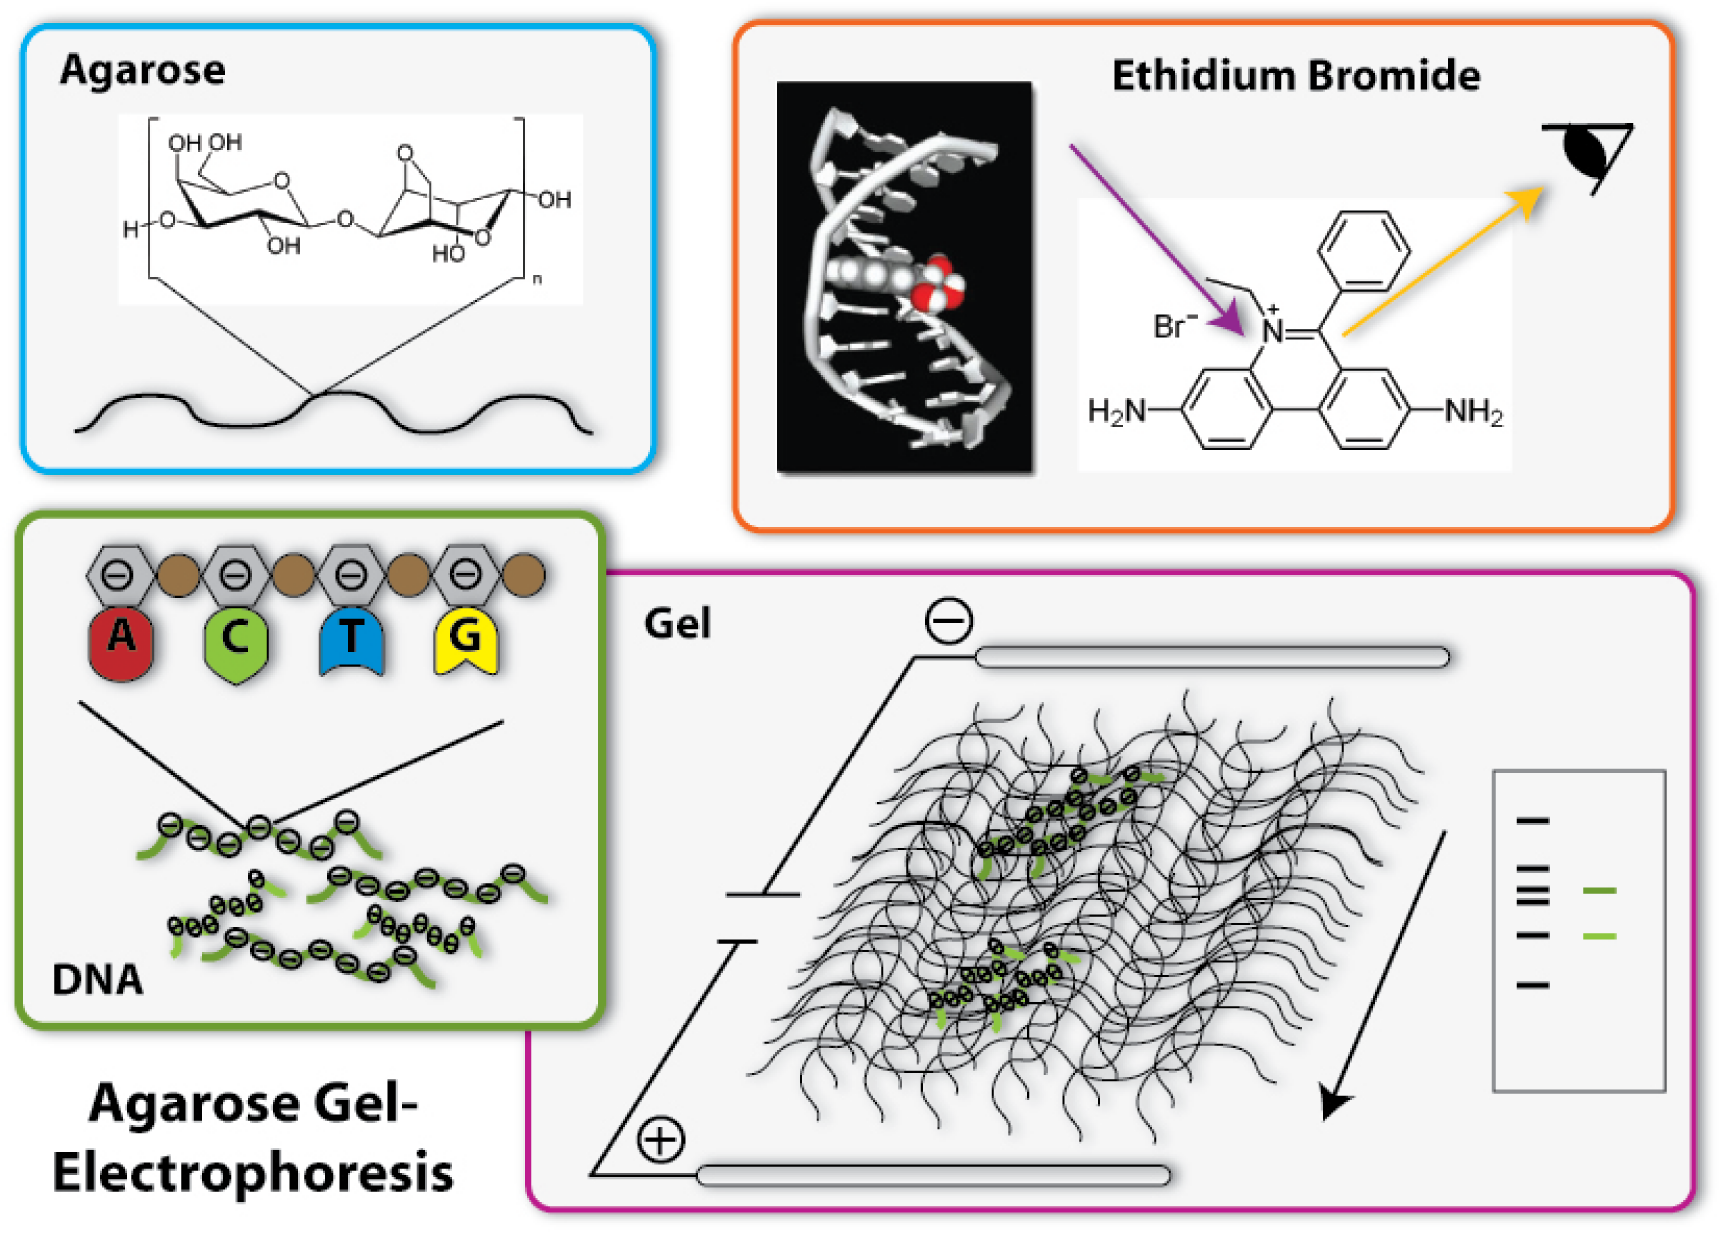
One of the most important tools in synthetic biology are bacterial plasmids. We already showed how they can be isolated and engineered. But how can you check, if really the right DNA has been isolated, for example? Of course, you can not see DNA! But you can determine the length of the DNA- fragments. Each DNA sequence has a defined length, because it is made of the same bricks, the nucleotides: So, a DNA-sequence, which is build of 400 nucleotides, has a length of 400 times the length of one nucleotide, naturally. Biologists generally call this length 400 base pairs (because every nucleotide contains a base, which is responsible for the encoding of the genetic information). A DNA-sequence containing 800 nucleotides is twice the length of the first one. To determine these differing lengths, we use agarose gel electrophoresis. So let us go through the steps of the procedure:
[back]
1. Production of the gel
The basis fort he separation of the DNA- fragments is provided by the agarose gel. Agarose consists of long chains of sugar molecules, which are very similar to the ones we daily eat in candies. The speciality of agarose is that the chains of sugar molecules can bind to each other to form a dense network. Thereby there consistency becomes gel like. This happens, if agarose is soluted in water and thereafter boiled. When the liquid cool down, it changes its consistency, becomes harder and forms a gel. You call this polymerization. Everybody who loves wobble pudding knows this phenomenon from gelatine. The agarose gel will serve as a molecular sieve, which the DNA will have to pass and wind through in the later steps. The higher the concentration of dissolved agarose is, the smaller the pores in the network are and the harder it will be for the DNA to find a way through. To prevent the gel from drying and provide enough liquid for the journey of the DNA, the gel is put into a buffer, a solution which supports the following procedure. [back]
2. Loading of the DNA
The DNA will now be loaded on one side of the gel. Therefore little slots have been formed on one side of the gel, so the DNA can be poured into them. Before this can happen, there need to be added some components to the DNA sample: First, a dye called Bromphenol Blue is added. This dye shows how far the solution put in the slots has already wandered in the gel, so the journey of the DNA can be stopped before it leaves the gel at the opposite side. Moreover, glycerol is added to the DNA samples. The density of glycerol is higher than the density of water, therefore it sinks to the bottom if put into a watery solution. If mixed with the DNA sample, glycerol makes this sample ‘heavier’ and lets it sink to the bottom of the slots in the gel. Without glycerol, the DNA-sample could easily mix with the buffer already in the slots, could again leave the slots and spread over the whole gel. Then it would be wasted, because it could not run through the gel and be separated. [back]
3. The electric field
Now we come to the actual process of the electrophoretic separation of the DNA-fragments. Therefore an electric field is applied between the two ends of the gel. This can affect the DNA, because DNA is a charged molecule. The backbone of the DNA partly consists of phosphates. These are the acid radicals of phosphoric acid, which you all know from cola: there it is responsible to make cola sour. These acid radicals are negatively charged and thereby give the whole DNA molecule a substantial negative charge. To draw the DNA-fibres through the agarose network, we now use the electric field: Since positive charges and negative charges attract each other, the DNA is drawn through the gel if one installs the positive pole of the electric field at the opposite end of the gel (opposite to the slots filled with DNA). Additionally, the negative pole is installed at the ‘back’ of the DNA behind the slots. Since charges with the same character repel each other, the DNA molecules are ‘kicked away’ from the slots. So far, everything is clear; the DNA- molecules wander through the agarose network in direction of the positive pole. But how are they separated according to their length? This is achieved due to the different behaviour of DNA-molecules with different lengths in this electrically enhanced gel: Long DNA- fibres are much slower in passing the network than short ones are because they constantly get stuck at the agarose fibres and have problems to get through the tiny pores. After a certain time of gel run, the long fragments are in a position much closer to the slots than the short fragments. The short ones are therefore running faster and have passed a much longer distance. So the ratio of running time to the passed distance is proportional to the length of the DNA-fragments. Therefore it is characteristic for the fragment length. Because of this you can approximate the length of an unknown fragment from comparing its running distance to the one of a fragment you already know the size of. Fragments with the same length are running at the same speed. Therefore they are located at the same level in the gel after a certain running time. You call a part of a lane in the gel, where DNA- fragments of the same length accumulate, a band. If you put DNA samples on the gel, where you don’t know the length of, and put DNA samples of defined length into another slot of the gel, you can compare the bands after a certain running time. If one band of the unknown sample is located at the same level than the defined sample which you know is 500 base pairs long – you then know: The unknown sample also contains DNA- fragments with 500 base pairs length. To simplify the work of molecular biologists, there have been developed mixtures of DNA- fragments with defined lengths, which can be put on the gel together with the samples to investigate. These mixtures are called ladders, because they form multiple bands which resemble a ladder. These ladders in principle are scales, which show you at which position in the gel the DNA- fragments with 500 base pairs should be, at which the ones with 100 base pairs and so on. [back]
4. Staining of the DNA
Now we have separated the DNA- fragments, how can we actually see them? Since up to now, the gel is colourless, only the blue dye we put in it can be seen, but no DNA- bands. So we have to stain the DNA to visualize it. This is done with the help of a dye called ethidium bromide. This dye can slide in between the base stocks of the DNA double helix, you also say it intercalates. So ethidium bromide intercalates into the DNA strands in regular intervals and thereby each strand is enriched with a certain amount of the dye. But still you can not see anything. This is because this dye needs to be activated, before it shows its colour, which then will be orange. To activate the dye, you illuminate it with UV-light (which contains very much energy). Now the dye will actually shine orange.
But the real thing which is special about ethidium bromide is that it shines much more intensively (50 to 100 times), if it is intercalated into DNA, than if it is free. So you can clearly differentiate the areas where DNA is one the gel (the bands) from the rest if you illuminate the gel with UV-light. Only they will shine in an orange colour. To document your gel results, you generally take a picture. [back]
GFP and fluorescent microscopy
After we have learned how to isolate a plasmid and check this on a gel, we will have a look on the effects of such a plasmid. As an example, we chose the Green Fluorescent Protein. You may learn more about how to bring the genes for this protein from the original organism into a bacterial plasmid in the molecular cloning article.
Originally, GFP is produced by jellyfishs. It has been isolated from the jellyfish Aequorea victoria, which is also sometimes called crystal jelly. So this animal, which is living off the west coast of North America, is able to make itself glow green. Generally, the ability of an organism to produce light as the result of a chemical reaction is called bioluminescence. Another famous animale in terms of bioluminescence is the glow-worm.
GFP is the oldest and most broadly used fluorescent protein in biotechnology. It is a protein, which is able to absorb light and emit light of lower energy and thereby glows green. Because it had such a great impact on this science and improved it a lot, this year’s Nobel Prize in chemistry was awarded for the discovery of GFP and its applications. If GFP is made by a cell and you illuminate this cell with UV-light, you can see a green light coming from this cell.
But how does this work? GFP works as a light catcher. There is a light catching complex inside the barrel like protein that can catch high energy UV-light. All the energy of this light flows into the light catching complex and activates it. Imagine a child with a lot of power and energy: It runs through your apartment, sings, screams and jumps some time. So it is kind of ‘activated’ and sets all its energy free. After a while, there is only little energy left, it gets quieter, tired and maybe falls asleep. In a way it is the same with GFP. In the very activated state, it can not hold all the energy it got and has to set it free. Since there is no singing and jumping GFP, it finds another way to lose all its power: It emits light. But not UV-light, like the one it got all the energy from, but green light. Therefore it is called GFP. But why is this? You may have heard of the general rule in science, that there is no process that can work without consumption of energy – this is why there exists nothing like Perpetual motion. So the GFP emits light with a lower energy than the one it first caught or absorbed. And light with a little lower energy than UV light is green. (This goes one according to the colours of the rainbow: Yellow light has less energy than green one, orange light less than yellow light and red light less than orange light). But where does the remaining energy go to, if the GFP sets free less energy than it absorbed? Well this energy is needed for the process of emitting light, for the process of glowing green.
Now we understand how GFP works. And if this protein is produced in a bacterial cell by a plasmid, the bacterial cell will glow green. You can see this when you illuminate a liquid bacterial culture with UV light.
Or you can see it with the help of a fluorescent microscope, which enlarges the vision of the bacteria and also has a source of UV light to activate the GFP protein. You can not only visualize whole bacterial cells with GFP, but also fine structures and single proteins. Because you can stick GFP to proteins you want to visualize, and it will keep its glowing ability and also won’t disturb the normal cell procedures.
There are also many derivatives of GFP available today. They all have little modifications, which change the colour of the light, the protein emits. So there is RFP, which emits red light, or YFP (yellow) and so on. With the help of all these fluorescent proteins, you can make funny thinks like drawing pictures or make animals glow. But they are, as mentioned above, primarily most important tools in biological and medical research. [back]
I see, you don't have to tell me: You also have gained a very good understanding of the technical background. Therefore we can now proceed to my description of the project details ... to step 5  [ ... back to step 4 ]
 "
"
