Team:Brown/Project/Testing
From 2008.igem.org
NeilParikh (Talk | contribs) |
NeilParikh (Talk | contribs) (→Design V2) |
||
| Line 42: | Line 42: | ||
==Design V2== | ==Design V2== | ||
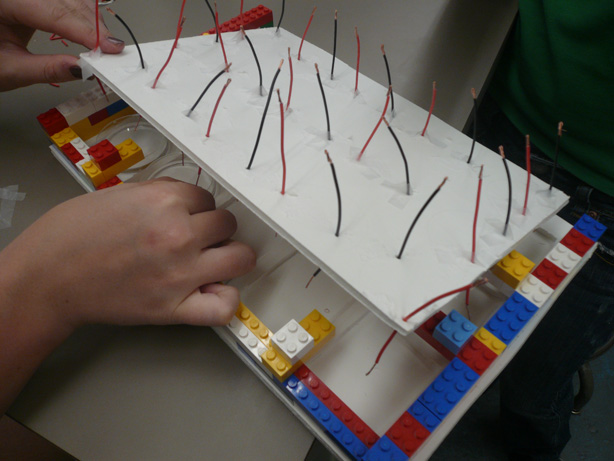
| + | [[Image:Brown lego appr.jpg|right|thumb|250px|Design V2]] | ||
| + | We moved to a second apparatus that fixed many of the problems we saw with Design V1. We added room for many wells, to allow for multiple tests in parallel. We also placed copper wire in each well to try and keep the electrode distance constant. Our second apparatus was made with Legos and poster board. At this point we only had a standard voltmeter that could detect large resistance changes between different salt solutions. The changes we expected to see, however, were on a much smaller scale, as determined by our mathematical calculations. | ||
| - | + | ''Problems:'' The copper wire was not stiff and would not stay at a fixed distance. We believed the voltmeter was not sensitive enough to detect magnitude of changes we were looking for. A major problem turned out to be that the voltmeter was outputting a DC (direct current) signal, which combined with copper electrodes, allowed for Redox chemistry. This led to very inconsistent readings. | |
| - | + | ||
| - | + | ||
==Revisions to the First Apparatus== | ==Revisions to the First Apparatus== | ||
Revision as of 04:40, 29 October 2008
|
ResistanceTeam Toxipop started off the summer focusing on measuring changes in resistance. Much of our summer work was devoted to the construction of an electrical circuit and measuring apparatus unique to our purpose. Many additions were made to the apparatus each week. Below, you will find information about the different "versions" of the apparatus including final information about our switch to Conductivity.
Design V1Our first apparatus design was rather simple. We started with a voltmeter and a Gorillapod. We believed the Voltmeter would allow us to measure changes in resistance over time as our cells lysed. The probes of the voltmeter were attached to the Gorillapod, thus fixing the distance between them. The cell solution was contained in a Petri dish into which the probes were lowered. Problems:The petri dish setup only allowed us to do one test at a time. Also, having to keep the entire dish open for hours on end allowed for evaporation of the solution, thus changing the volume and affecting the resistance measurements. It was also difficult to ensure that the probes were exactly the same distance apart between tests.
Design V2We moved to a second apparatus that fixed many of the problems we saw with Design V1. We added room for many wells, to allow for multiple tests in parallel. We also placed copper wire in each well to try and keep the electrode distance constant. Our second apparatus was made with Legos and poster board. At this point we only had a standard voltmeter that could detect large resistance changes between different salt solutions. The changes we expected to see, however, were on a much smaller scale, as determined by our mathematical calculations. Problems: The copper wire was not stiff and would not stay at a fixed distance. We believed the voltmeter was not sensitive enough to detect magnitude of changes we were looking for. A major problem turned out to be that the voltmeter was outputting a DC (direct current) signal, which combined with copper electrodes, allowed for Redox chemistry. This led to very inconsistent readings. Revisions to the First Apparatus
The new apparatus implemented an Alternating Current instead of a Direct Current. The Alternating Current prevents the migration of charged molecules to one electrode, thus drastically affecting the resistance reading.
The FINAL Apparatus
You can take readings in units of conductivity (µS/cm) or concentration (mg/L TDS as NaCl). The Conductivity Probe can monitor conductivity at three different sensitivity settings:
Conductivity is directly proportional to concentration over the entire range. The probe has a fast response time, reaching 98% of full value in less than 5 seconds. You can load saved calibrations using any of the Vernier data-collection programs. Alternatively, you can do a quick two-point calibration: the probe is left out of solution for one calibration point (0 µS/cm) and is placed in a known standard (1000 µS/cm solution is provided) for a second calibration point. More precise calibration in two different standards is also possible using our software. The Conductivity Probe uses alternating current at its electrodes; this prevents polarization and electrolysis, so that solutions being tested are not fouled. Corrosion of metal electrodes is not a problem with this epoxy-body graphite electrode. It has built-in temperature compensation, which allows you to do your calibrations in the lab, and then make measurements outdoors without temperature changes affecting conductivity readings. -http://www.vernier.com/probes/con-bta.html
|
 "
"


