Team:TUDelft/Temperature results
From 2008.igem.org
Results
Assembly of BB_K115012 and BB_K115029 - BB_K115036
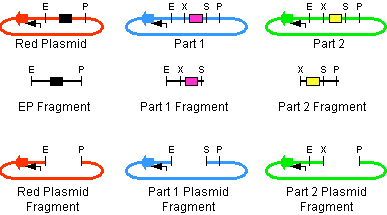
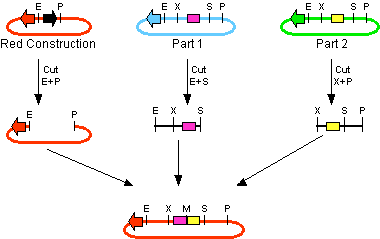
The first challenge of this project was to assemble all the devices we wanted to measure. An overview of these devices can be found here. For the actual construction of all devices the 3A assembly strategy was chosen. A complete protocol of this strategy can be found on OpenWetWare. A schematic representation of this assembly method is depicted in figure 1A and 1B.


For the succesful use of this assembly, it is essential that the DB3.1 Eschirichia coli strain is not used as it tolerates the presence of the CcdB gene. Throughout the project we used commercial Top10 cells of Invitrogen that were made competent chemically. Furthermore, it is important to note that the XbaI and SpeI restriction enzymes generate compatible sticky ends. Assuming that we want to place two BioBrick parts behind each other in one plasmid, but these are present in seperate plasmids before assembly (as is the case in Figure 1A, parts are depicted in purple and yellow in the blue and green plasmid, respectively). 3A assembly can be conducted by taking an empty plasmid that has a different antibiotic resistence as the other two plasmids (red in figure 1A and B, CcdB is present). Three seperate restriction reactions should be started as shown in figure 1A. After cleaning up the restriction reactions they are mixed and ligated together. Parts can be ligated in several ways:
- 1. The CcdB gene can be ligated back in the vector - If this happens, cells will not grow after transfection, as the E. coli strain used should not be CcdB gene tolerant.
- 2. Other parts can be ligated back in the vector - Other plasmids should not have the same antibiotic resistence as the red plasmid, in other words, these are selected for.
- 3. Ligation as depicted in figure 1B - This is the ligation we are looking for and it should yield colonies after transformation.
- 4. Other combinations of backbones and/or parts - It is possible other combinations (e.g. the three backbones together) form a plasmid that yields colonies, these parts will be much larger as the ones formed in option 3. Colony PCR's are performed afterwards to screen for these.
In the end, the result on the gel of the colony PCR product is conclusive in terms of the succes of the 3A assembly. For all our parts at least three of the 3A assemblies (first promoter + ribosome binding site and luciferase + terminators, afterwards the result of these two together) gave our final product. An overview of the result on the gels can be found here. We succeeded in getting colonies that gave the correct band size on the gel for BB_K115012 and BB_K115029 - BB_K115036.
 "
"